Street Source is shutting down April 30th, 2026. Read the announcement
how to: re-index torsion bars (with pics)
42616 views
86 replies
44 following
A
how to: re-index torsion bars (with pics)
LN
low n slow
+1y
hey guys i just finished re-indexing my torsion bars tonight in -9 degree weather in my garage, and most of the posts i found didnt explain really good how to re-index them so i was going in blind.
so heres my best attempt to fully explain how to re-index the torsion bars for anyone new or wanting to do so but cant find a decent how to. my truck was a 1991 b2200. i would think bolts would be the same size so heres the tools needed.
safety glasses
17mm wrench
17mm socket
3/8" or 1/2" ratchet
long johnson bar
grease
penetrating fluid
jack and jack stands
rag or something to clean the splines off
hammer
optional:
mechanic gloves, my truck was rusted and greasy
beer (to congradulate yourself after)
flashlight
power tools (dam u for having them )
ok so lets get started while its all fresh on my mind.
I WILL NOT BE HELD RESPONSIBLE FOR ANY DAMAGE OR MISTAKES. just saying how it did this and trying to help out.
step #1
loosen the nuts on your tires, jack up the truck, and put the jack stands on the frame rails. i put mine right behind the front cab mount. this allows the suspension to have less tension as to if you put it on the lower control arm or crossmember. take off your wheels to allow easier reach at the bracket.
step #2
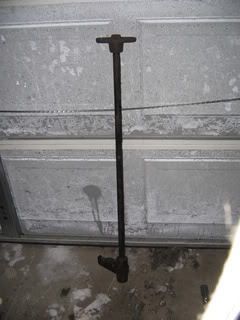
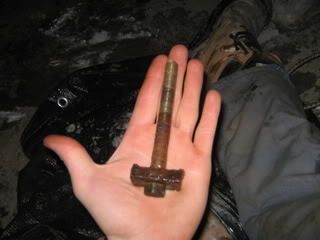
under the center of the cab, you will see a long rod running front to back. that is your torsion bar. at the end of the bar, there is a hook with a bolt going vertical. this is the bolt we want to loosen. spray some penetrating fluid on the threads and bolt. let it sit for a bit if rusted. grab your 17mm socket and johnson bar, and crack the bolt loose. then use your ratchet and take out the bolt. this bolt holds the tension on your torsion bar. the bolt is about 4" long. so you will loosen this bolt until you it comes out, the more you turn it the easier it will get because its taking the tension off the torsion bar.

step #3
after removing the bolt, follow the torsion bar to the front of the vehicle. you will see a bracket with 2 bolts going through the lower control arm. use your 17mm socket, and johnson bar to crack the two bolts. use your ratchet and 17mm socket to take the bolt out.

step #4
both my sides were as easy as a simple pull and the torsion bar came out.
step #5
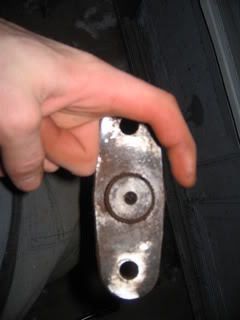
DONT! take the bracket off the spline. hold it in place. clean the side of the bracket that was against the lower control arm and the end of the spline. next mark with a white out a straight line of 1 tooth and groove.
step #6
knock off the bracket with a hammer.
step #7
clean the inside of the bracket and spline, then grease the spline to make it easier if needed to be removed again. when doing this STAY AWAY FROM YOUR MARKING! i used a perminant marker, and when i did this i almost completely wiped off the mark, luckily i got it right.
step #8
for the DRIVERS SIDE, turn the torsion bar COUNTERCLOCKWISE the amount of splines you want for your drop. i did 3 and got me almost tucking tire, *edited* i would recommend 2 splines, 3 makes u sitting on bumpstops, so i cut them off and it rides really bumpy, so i would say 2 would be best. so to make sure you get it right, hold the bar back to where it will go, and the hook at the back should be pointing upward. PASSENGER SIDE gets turned CLOCKWISE and i did the same thing holding it up, just to make sure.
step #9
re-assembly! hard works done on our way home. so what i did was put the adjusting bolt in and threaded it in a couple times, then hooked the bracket on. then i went to the front and put the 2 bolts in the front of the torsion bar. i hooked the back first to make it easier to align the front bolts without trying to hold the whole torsion bar up.
step #10
tighten the 17mm bolts with your ratchet and wrench.

step#11
tighten the rear bolt up with your 17mm socket and ratchet. i tightened mine until i could see about 3/4" between the nut and the bracket.
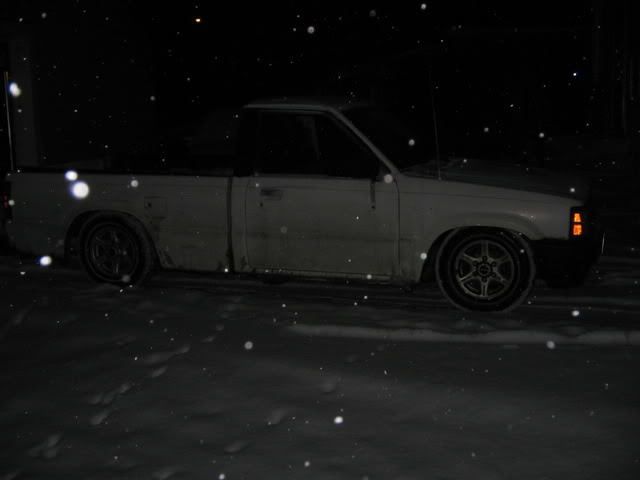
step #12. put your rims back on and hand tighten the nuts, jack up the truck, take your stands out and see how low you got it!

NOTES: after i finished mine, i noticed once on the ground that i was sitting on the bumpstop. so i will need to cut this out next time im under there. i finished at 10pm, so i called it a night. this took me about 2 hours with hand tools, no tutorial like this, and had to go to my parents house to get some tools. you should get an alignment as it will be outta wack a bit. if you reindex 2 or more notches, i would recommend some lowering shocks from either s10, nissan d21 hardbody or isuzu pup. whatever is easiest for you to find. so i went back today and did it again to take pics for you guys, took like 15 minutes to do the one side for picture purposes. EASY.
i cut the bumpstops out cause when i put the truck on the ground, the lower control arm was ON the bumpstop, now i need smaller shocks. i have the adjusting nut almost all the way up, and i love the handling around turns with no power steering its really fun.
i guess you would not need to take off the bracket, but i did to make it easier as i was working on the ground. and easier to get the torsion bar out of the bracket and clean it all under good lighting.
if you guys have any comments or notes please let me know and i will correct or add any of my mistakes. it was my first time with torsion bars, but i got it to work.
hope this helps a lot and will make you very confident going into this process. p.s. should sticky
so heres my best attempt to fully explain how to re-index the torsion bars for anyone new or wanting to do so but cant find a decent how to. my truck was a 1991 b2200. i would think bolts would be the same size so heres the tools needed.
safety glasses
17mm wrench
17mm socket
3/8" or 1/2" ratchet
long johnson bar
grease
penetrating fluid
jack and jack stands
rag or something to clean the splines off
hammer
optional:
mechanic gloves, my truck was rusted and greasy
beer (to congradulate yourself after)
flashlight
power tools (dam u for having them )
ok so lets get started while its all fresh on my mind.
I WILL NOT BE HELD RESPONSIBLE FOR ANY DAMAGE OR MISTAKES. just saying how it did this and trying to help out.
step #1
loosen the nuts on your tires, jack up the truck, and put the jack stands on the frame rails. i put mine right behind the front cab mount. this allows the suspension to have less tension as to if you put it on the lower control arm or crossmember. take off your wheels to allow easier reach at the bracket.
step #2
under the center of the cab, you will see a long rod running front to back. that is your torsion bar. at the end of the bar, there is a hook with a bolt going vertical. this is the bolt we want to loosen. spray some penetrating fluid on the threads and bolt. let it sit for a bit if rusted. grab your 17mm socket and johnson bar, and crack the bolt loose. then use your ratchet and take out the bolt. this bolt holds the tension on your torsion bar. the bolt is about 4" long. so you will loosen this bolt until you it comes out, the more you turn it the easier it will get because its taking the tension off the torsion bar.
step #3
after removing the bolt, follow the torsion bar to the front of the vehicle. you will see a bracket with 2 bolts going through the lower control arm. use your 17mm socket, and johnson bar to crack the two bolts. use your ratchet and 17mm socket to take the bolt out.
step #4
both my sides were as easy as a simple pull and the torsion bar came out.
step #5
DONT! take the bracket off the spline. hold it in place. clean the side of the bracket that was against the lower control arm and the end of the spline. next mark with a white out a straight line of 1 tooth and groove.
step #6
knock off the bracket with a hammer.
step #7
clean the inside of the bracket and spline, then grease the spline to make it easier if needed to be removed again. when doing this STAY AWAY FROM YOUR MARKING! i used a perminant marker, and when i did this i almost completely wiped off the mark, luckily i got it right.
step #8
for the DRIVERS SIDE, turn the torsion bar COUNTERCLOCKWISE the amount of splines you want for your drop. i did 3 and got me almost tucking tire, *edited* i would recommend 2 splines, 3 makes u sitting on bumpstops, so i cut them off and it rides really bumpy, so i would say 2 would be best. so to make sure you get it right, hold the bar back to where it will go, and the hook at the back should be pointing upward. PASSENGER SIDE gets turned CLOCKWISE and i did the same thing holding it up, just to make sure.
step #9
re-assembly! hard works done on our way home. so what i did was put the adjusting bolt in and threaded it in a couple times, then hooked the bracket on. then i went to the front and put the 2 bolts in the front of the torsion bar. i hooked the back first to make it easier to align the front bolts without trying to hold the whole torsion bar up.
step #10
tighten the 17mm bolts with your ratchet and wrench.
step#11
tighten the rear bolt up with your 17mm socket and ratchet. i tightened mine until i could see about 3/4" between the nut and the bracket.
step #12. put your rims back on and hand tighten the nuts, jack up the truck, take your stands out and see how low you got it!
NOTES: after i finished mine, i noticed once on the ground that i was sitting on the bumpstop. so i will need to cut this out next time im under there. i finished at 10pm, so i called it a night. this took me about 2 hours with hand tools, no tutorial like this, and had to go to my parents house to get some tools. you should get an alignment as it will be outta wack a bit. if you reindex 2 or more notches, i would recommend some lowering shocks from either s10, nissan d21 hardbody or isuzu pup. whatever is easiest for you to find. so i went back today and did it again to take pics for you guys, took like 15 minutes to do the one side for picture purposes. EASY.
i cut the bumpstops out cause when i put the truck on the ground, the lower control arm was ON the bumpstop, now i need smaller shocks. i have the adjusting nut almost all the way up, and i love the handling around turns with no power steering its really fun.
i guess you would not need to take off the bracket, but i did to make it easier as i was working on the ground. and easier to get the torsion bar out of the bracket and clean it all under good lighting.
if you guys have any comments or notes please let me know and i will correct or add any of my mistakes. it was my first time with torsion bars, but i got it to work.
hope this helps a lot and will make you very confident going into this process. p.s. should sticky
Post was last edited on Jan 07, 2011 02:33. Edited 1
time.

baha
+1y
great write up man this will really help a lot of people!
baha
+1y
do you have any pics to go with this?
T
truknut72
+1y
Thanks for the write up.. I never re-indexed the bars before, that made it alot simplier for me. About how many inches did it drop you? Any pics?
LN
low n slow
+1y
i can take pics tomorrow. i did this 3 weeks ago but i posted on the mazdatruckin forum. i did 3 splines, which dropped it about 6 inches with the adjusting bolt all the way up. so i can go lower.
3 splines made it tuck my stock wheels 1". i think i would recommend 2 splines. like i said in the notes i think, i rubbed out my marking with grease so i kinda guessed...kinda knew haha. i measured today just to see while my truck was warming up, and my fender is 23 1/2" from ground.
i dont have smaller shocks, and i bottom out over sewers and large cracks in the road haha. SO WHEN DOING REPLACE SHOCKS. i also have 3" blocks and i removed the middle leafs on sunday. and i bottom out the back as well..bumpy ride but looks sick. tucks rear tire. top of my truck is at bed level of the new chevys and fords.

lofosho86
+1y
very good job on this write up!should help out alot of people!oh yeah.....PICS ARE NECESSARY!!!!hahahahaha
LN
low n slow
+1y
cant take tomorrow... CANADAS WINNING THE JUNIORS after i get done work. so thursday i will. promise haha
LN
low n slow
+1y
going to take out a torsion bar just to get some pics for the sticky. stay tuned!
C
cvillen17
+1y
thanks im going to do it this weekend and maybe get my leaf spring dearch as well
LN
low n slow
+1y
good luck buddy pm me a pic when u get it done
Related Discussions in Mazda Lowering Static
Thread
Posts
Last Post

12
L
last post by
Low5.0mazda +1y