Street Source is shutting down April 30th, 2026. Read the announcement
York 210 build and Accuair install

75dually
+1y
Found out what some of my calibration issues were when talking to Accuair tech support. Their tech support is really good by the way.
If you go back in my posts I showed where I am using a 1/2" Airbaggit valve. The valve is fine and works with their system. The issue, or at least part of the issue is this valve is to fast for their ECU. My valve would exhaust to fast for the sensors, thus the ECU would not be able to pick up the rapid change, and so it would throw the "Ride height sensor travel warning". So I had to slow it down. What I did was take the brass muffler off the valve and replace it with a 1/2" ball valve. This way I could fine tune the rate of the air coming out the exhaust side. This worked really well.
So the system could now go through the calibration phase... Well almost... The other issue I ran into is it would not raise the front end very high. Maybe 1"-2", but no more than that. The rear worked fine, but the front was not cooperating. So I again called the tech support line, and they said to raise the tank pressure. The cool thing about the Accuair system is you can change the tank pressure switch with your iPad, iPhone, in cab rocker switch, or Accuair touch pad (or even soon to be Andriod app!!!). The stock pressure is set at 150psi, but you can change it to 175psi or even up to 200psi all with the touch of your finger. Pretty cool in my book! So tonight I will change the setting to 175psi and see if that does the trick, and if not I will move it up to 200psi (hope I don't have to go that high...)
I let you know what happens... Stay tuned...
75dually
+1y
I had to end up taking the tank up to 200psi for the system to operate properly, but in the end it worked!
I did a video tonight of it going through the 3 different raise and lower modes. My son was in the front seat clowning around. Check it out!
I did a video tonight of it going through the 3 different raise and lower modes. My son was in the front seat clowning around. Check it out!

comegetsome
+1y
Sweet....I'm excited to get my kit going....and I've run all my trucks at 200psi for years without issues....you will be good
75dually
+1y
A couple of key notes about the York 210 I have learned so far.
First of all I overfilled the sump in the York the first time I added the 30 weight oil. I kept checking with the dip stick, and everything looked to be just fine. So last night as I looked at the coalescing filter I noticed it was full! Oh no! So I emptied it and checked the oil level in the York. It seemed low to me, but what seemed right the night before flooded the system! So maybe this is the right level for this particular York.
I thought that the oil fix I did on the first page of the post would stop oil from getting out of the sump, but from what I have read on other sites if you over fill a York it will do just what mine did. Pump a bunch of oil out of the sump, and into your filters and tanks. The other thing I have also found with others who have run these pumps is that they will run on less oil than they thought initially. So maybe my York has found it's happy medium. After I ran the calibration on the system tonight, I played around with the settings and even did that video. So the pump had a longer run time, and when I was all done I checked the oil level again and it was the same as last night. So hopefully I am done and the oil level has stabilized.
I also let the belt run a while and break in before I ran the tension up. I did increase the tension tonight so now I have no belt shake, and the overall tension seems correct now.
As I learn more about running a York I will of course let you know.
S
short1
+1y
I've been looking for a coalescing filter and can't seem to find the right one. I'm also running 200 psi through my air too but can't find the right filter. Can I ask where you picked up that filter your running?
75dually
+1y
1. 210 York compressor - eBay - 73-84 VOLVO 240 260 YORK 210 A/C COMPRESSOR
2. Build mounting bracket - Local steel supplier - 1/4" Plate, 3/4"tubing 1/8"wall, 1/2" all thread, and associated bolts nuts and washers
3. V-Belt - Napa Drive belt
4. Alternator pulley - Kilby Enterprises - Part #061-003
5. Oil fix - sheet metal screw - Size screw to fit oil hole tightly
6. Flange fittings - Kilby Enterprises - Part #28723
7. Intake filter - eBay - Air Compressor Intake Filter Silencer 1/2" NPT Metal Housing with brass 1/2" NPT fitting
8. Dip stick - Kilby Enterprises - Part #99-431
9. Oil/Water separator - eBay - 1/2" Particulate filter moisture for compressed air systems air compressor F704
10. Coalescing filter system - eBay - Coalescing Intermediate Oil Removal Filter, NPT 1/2 Inch
11. Main air line from compressor - Local tractor dealership - Gates 1/2" hydraulic line with 1/2" NPT swivel ends
12. ISO relay - Napa - ISO automotive 12V relay
13. Check valve - eBay - 1/2" Threaded In-Line Brass Spring Check Valve
Above is the items list for what I used to build my York 210 project. I have not listed every nut, bolt, and brass fitting. That is for you to source locally at Home Depot or Lowes or ??? This is not a shopping list, but hopefully a reference for you to use on the major items you will need to source. I listed each major item, the supplier or place I purchased it from, and the description of the parts. Where I have the part number I gave it, but note I did not give the V-Belt part number, each and every project is going to be different than mine so the best thing I can tell you is to visit your local Napa store or local parts store and they can help you size the belt. On the items I bought on eBay. Simply cut and paste the description into their search box and the item I bought should come up. If not it will get you a selection of similar items.
Some advice: As most others that have tackled this type of project would tell you, patience and precision is everything. Take your time and be precise. Belt alignment is super critical. Which means your bracket has to be right on the money. I spent more time than I want to admit making sure the belt was as dead on as I could get it. If you have a laser level, shine it down the valleys of the pulley's, or take a good straight edge and make sure that you have proper alignment. Make sure you have really good electrical connections. Use quality hardware (nuts, bolts, washers, etc..) it shows in the final product.
I hope the above list helps. I have enjoyed this portion of my build a lot. If you have questions I can help with let me know and I will do what I can...
75dually
+1y
Short1 - See the above list. I got mine off eBay. Hope that helps!
J
jmig
+1y
75Dually I just sent you a PM about wiring up the ECM using a York 210. I am wanting to make sure I am using the correct relay since Accuair doesn't show using a EDC in their install manual.
75dually
+1y
To answer the above question the Acuuair instructions only show the example of 1 or 2 electrical compressors, which is standard in most installations today. However if you are doing a York like I have you are going to have to do some additional steps in order to make the system work correctly. Their instructions show some sort of compressor relay, not sure what that is, but for this discussion don't worry about it because it has nothing to do with this type of install.
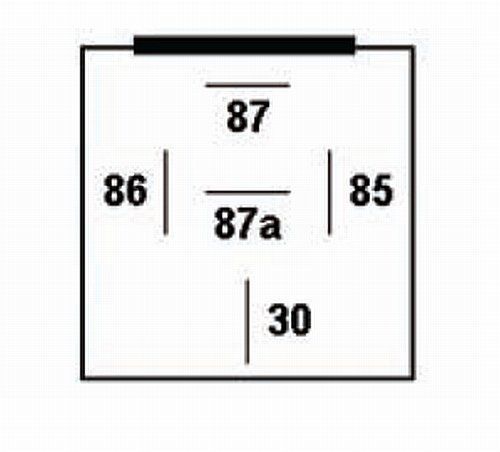
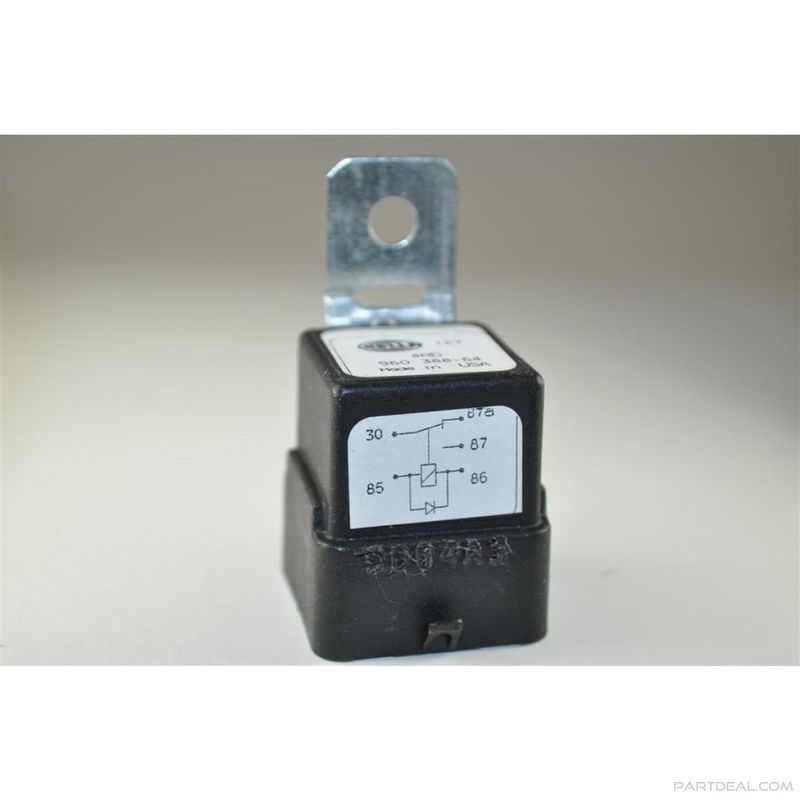
First thing you are going to need is an ISO relay. Buy a Hella standard ISO relay and don't mess around with anything else. I cannot stress that enough. Remember this is a crucial part of your air system and if you want it to function correctly for a long time then buy the right parts the first time. OK I am off my soapbox now...
There are 2 wires they show in the Accuride instructions for the compressors, one red and one yellow. The red needs a constant 12V source, and the yellow goes to the ISO relay. Please see this video on how to hook up a relay. " target="_blank" target="_blank" target="_blank" Basically you have 5 pins in a standard ISO relay, 4 of which you will use in this situation. Use the 4 pinouts that the video shows. You have one for ground, one for the source (yellow wire), one for the wire that goes to the York, and the last wire is from a 12V ignition source. Once you find the correct pinout location the wiring is basic stuff.
What a relay does for you is that when the ECU sends a signal that the tanks are low on air from the pressure switch it energizes the yellow wire. That in turn will energize a small magnet inside the relay which in turn sends power to the York clutch. This is a very efficient way to cycle the York clutch which has a higher current draw than the yellow wire can handle.
One thing that I have found, if you are going to run a York you will get a low voltage error window pop up saying your system will not function properly because the system is below 10.5 volts. Ignore this. The reason for this is the ECU does not see any electrical compressor voltage and thus trips the error code.
I have put a couple of pictures below of a standard ISO layout, and a pic of the style relay I used.
I hope this helps. If you have other questions let me know.
J
jmig
+1y
Thanks Chris
Related Discussions in Dually Suspension
Thread
Posts
Last Post
Michigan Metal Works A-Arm group buy 88-98 Chevy/GMC 1500 to 3500 and dually's
S
last post by
Strokersace +1y
8
8
S
last post by
Strokersace +1y
