Street Source is shutting down April 30th, 2026. Read the announcement

Project D350 Build Thread

D350
+1y
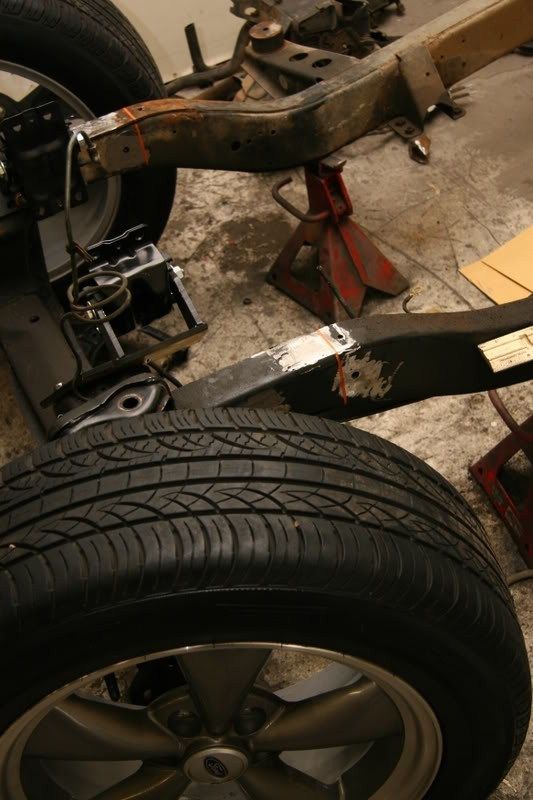
OH yeah! I forgot to add... during the previous week I found a guy selling his 17" 05 Mustang GT Bullitt wheels. I somehow talked him down to $200. Stoked!
April 6, 2008
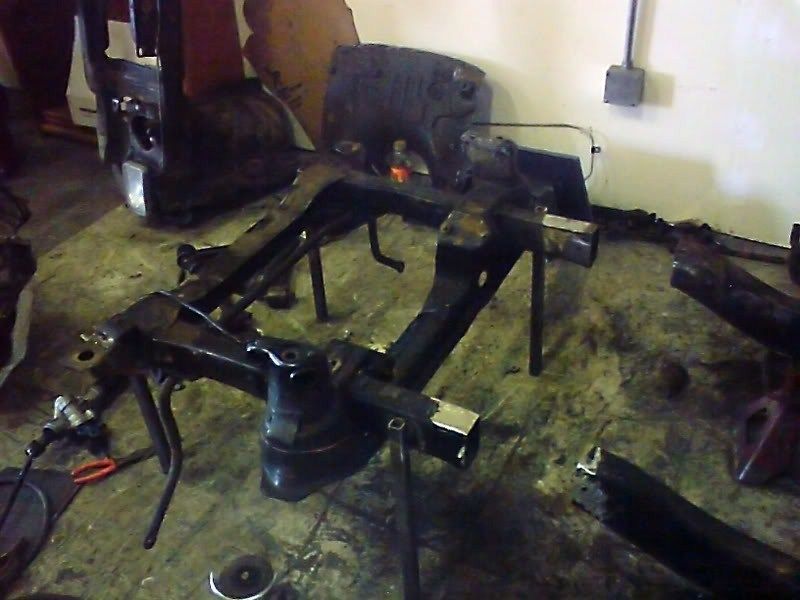
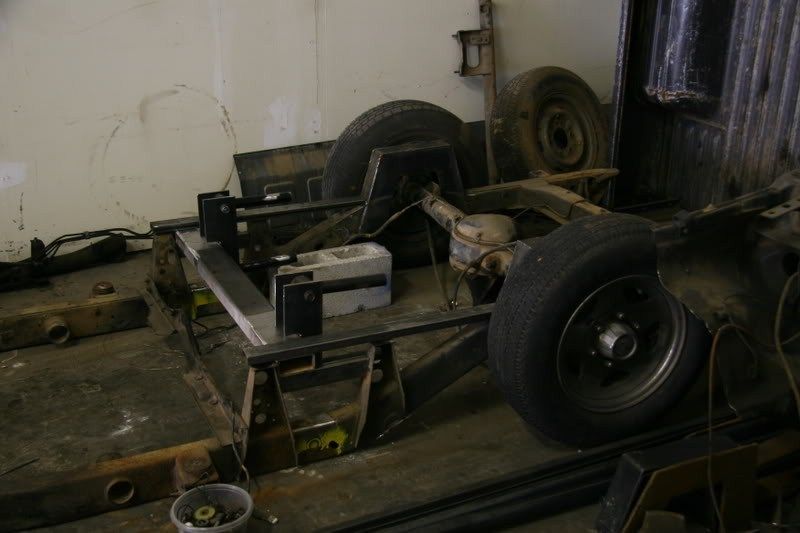
The frame is all clear now so I can start hacking it into pieces.
The thing about the D50 (perhaps the same with most trucks) is ALL of the cross members hang down below the frame rails preventing you from laying out true frame. This includes the engine cross member. Instead of rebuilding the cross member, I decided to Z the frame. Z'ing the frame helps out with front suspension geometry, and since I want this truck to handle in the turns and not just the drag strip, I figured it would be worth it. Here's a little "how to" on Z'ing a D50 frame the Aaron way. (I say that because I've had people tell me they've never seen it done that way.)
Find out where the Z is going to be. If you're keeping the stock steering you need to watch the steering box, but you need to make sure it's far enough forward to clear the cab floor.
Once you find the spot put jack stands solidly under the frame behind the cut mark. It's very important that the back half of the frame doesn't move until the front is welded back on. The front section of the frame is now hanging freely.(Forgive the cell phone pics. I wasn't going to waste a day of work just because I didn't have my good camera.)
What I did was temporarily weld 4 heavy duty legs onto the front from the frame to the ground. They're not supporting weight at this point but they are all touching the ground firmly.
Now it's time to make the cut and let the legs take over. After cutting, the front will remain at the exact height and angle as the rest of the frame.
Ta DA!
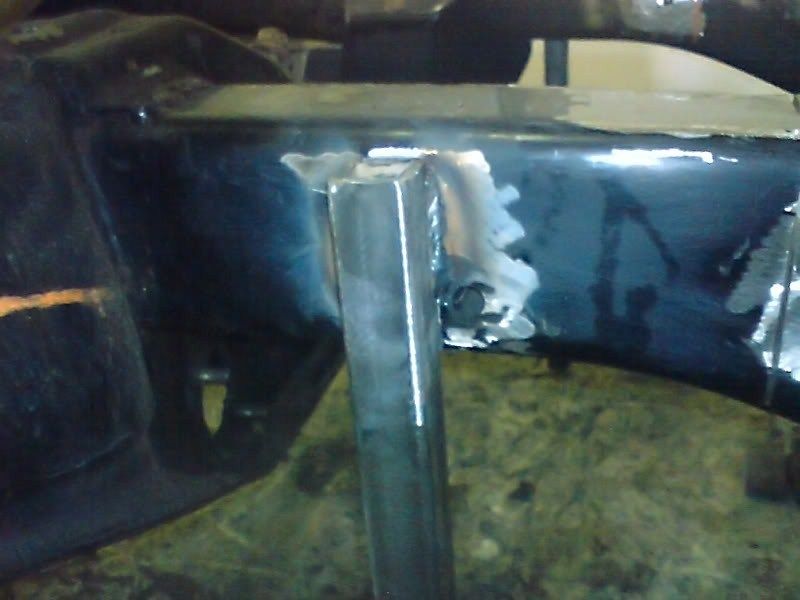
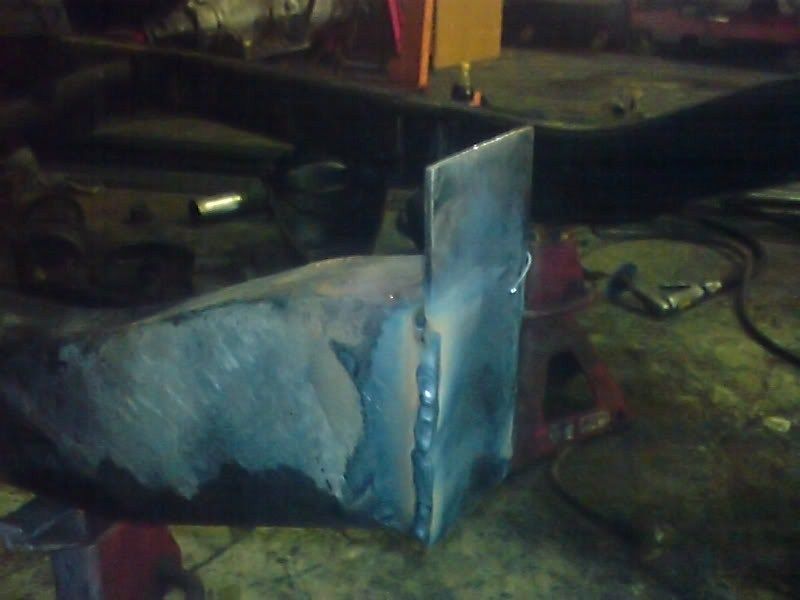
Next I welded a cap plate onto the freshly cut frame on the back section. Since I did a 2 inch Z I made the cap plate 2" taller than the frame itself. Make sure if you weld this plate to the front the plate hangs down and if you weld it to the rear it sticks up (like mine) or you will be Z'ing the frame in the wrong direction. Think 4x4.
Now you have a bit of inner strength and a gauge to make sure everything is lining up.
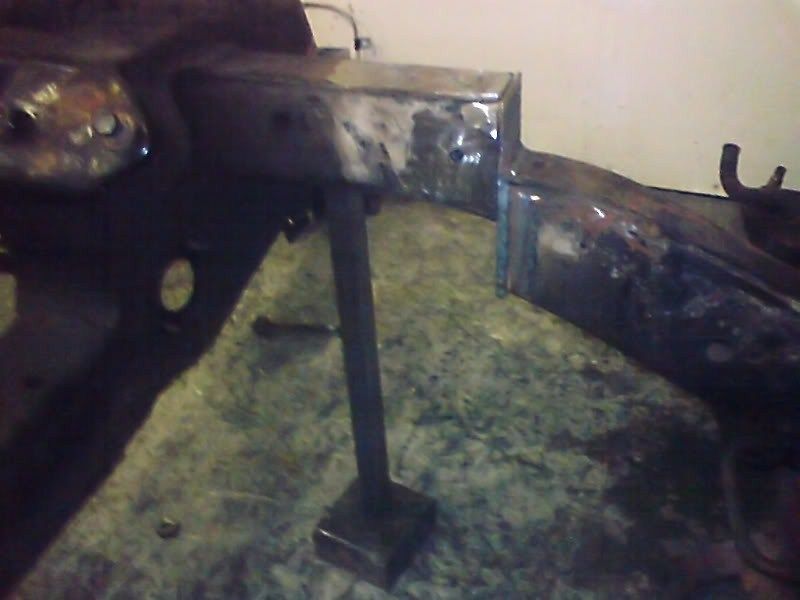
Then what I did, again since I was doing a 2 inch Z, I cut 4 pieces of 2x4" steel. (Note: a steel 2x4 is actually 2 inches by 4 inches unlike a wood 2x4. So don't use wood unless you're doing a 1.746273" Z :grin: ) I put a 2" block under each of the four temporary legs. It is now exactly 2 inches higher. Align everything and notice how the top lines up nicely with that cap plate from earlier.
Weld it!!! But don't remove the legs yet. It might not sag, but if it does your screwed.
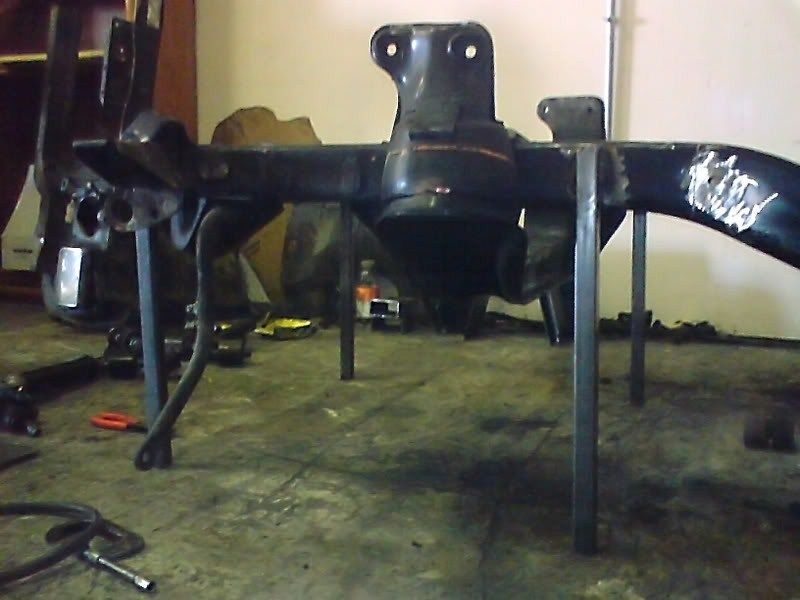
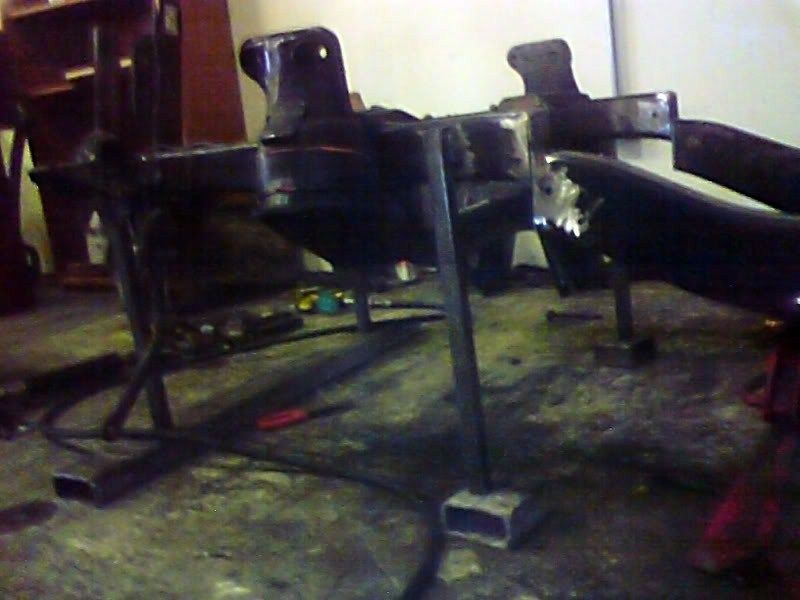
My next step was to make 4 matching reinforcement plates for the sides. I drilled holes in the plates for plug welds for even more strength. (People say I over build stuff, but if you think about it, this Z holds up the weight of the rear of the frame, the cab, and everything in it including you and your big boned girlfriend. When you hit a bump all that weight is exaggerated. Summarized, make sure it's strong.)
After welding the side plates on, I welded on some 2.5" strip steel to the top and bottom and I cleaned it up.
A finished Z!
Hope that was worth posting. Let me know!
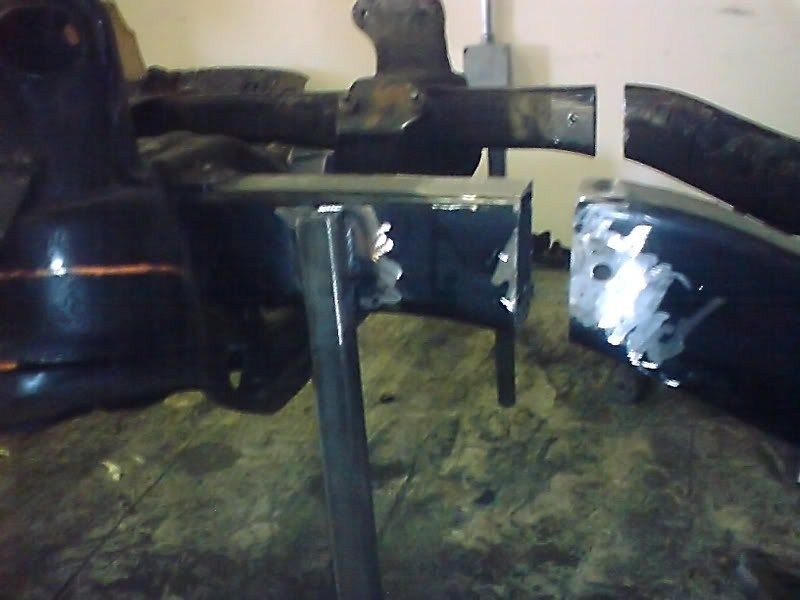
Also in the same day I did the 8 inch step notch... but I think that's at least somewhat self explanatory. If not, I'll just say... first weld on the notch, THEN cut the frame out. Don't cut the frame and try to put it back together using the notch.
I had a few extra minutes so I cut out the other two cross members that kept the frame hoovering.
I can now fully lay frame.
April 6, 2008
The frame is all clear now so I can start hacking it into pieces.
The thing about the D50 (perhaps the same with most trucks) is ALL of the cross members hang down below the frame rails preventing you from laying out true frame. This includes the engine cross member. Instead of rebuilding the cross member, I decided to Z the frame. Z'ing the frame helps out with front suspension geometry, and since I want this truck to handle in the turns and not just the drag strip, I figured it would be worth it. Here's a little "how to" on Z'ing a D50 frame the Aaron way. (I say that because I've had people tell me they've never seen it done that way.)
Find out where the Z is going to be. If you're keeping the stock steering you need to watch the steering box, but you need to make sure it's far enough forward to clear the cab floor.
Once you find the spot put jack stands solidly under the frame behind the cut mark. It's very important that the back half of the frame doesn't move until the front is welded back on. The front section of the frame is now hanging freely.(Forgive the cell phone pics. I wasn't going to waste a day of work just because I didn't have my good camera.)
What I did was temporarily weld 4 heavy duty legs onto the front from the frame to the ground. They're not supporting weight at this point but they are all touching the ground firmly.
Now it's time to make the cut and let the legs take over. After cutting, the front will remain at the exact height and angle as the rest of the frame.
Ta DA!
Next I welded a cap plate onto the freshly cut frame on the back section. Since I did a 2 inch Z I made the cap plate 2" taller than the frame itself. Make sure if you weld this plate to the front the plate hangs down and if you weld it to the rear it sticks up (like mine) or you will be Z'ing the frame in the wrong direction. Think 4x4.
Now you have a bit of inner strength and a gauge to make sure everything is lining up.
Then what I did, again since I was doing a 2 inch Z, I cut 4 pieces of 2x4" steel. (Note: a steel 2x4 is actually 2 inches by 4 inches unlike a wood 2x4. So don't use wood unless you're doing a 1.746273" Z :grin: ) I put a 2" block under each of the four temporary legs. It is now exactly 2 inches higher. Align everything and notice how the top lines up nicely with that cap plate from earlier.
Weld it!!! But don't remove the legs yet. It might not sag, but if it does your screwed.
My next step was to make 4 matching reinforcement plates for the sides. I drilled holes in the plates for plug welds for even more strength. (People say I over build stuff, but if you think about it, this Z holds up the weight of the rear of the frame, the cab, and everything in it including you and your big boned girlfriend. When you hit a bump all that weight is exaggerated. Summarized, make sure it's strong.)
After welding the side plates on, I welded on some 2.5" strip steel to the top and bottom and I cleaned it up.
A finished Z!
Hope that was worth posting. Let me know!
Also in the same day I did the 8 inch step notch... but I think that's at least somewhat self explanatory. If not, I'll just say... first weld on the notch, THEN cut the frame out. Don't cut the frame and try to put it back together using the notch.
I had a few extra minutes so I cut out the other two cross members that kept the frame hoovering.
I can now fully lay frame.


airrideluvtruck
+1y
Nice I like the way you did the Z.

TEEBAGGINNN
+1y
Good progress.

djleighk15
+1y
Sick Project, Cant wait to see end results

FreaksLo720
+1y
BUMP!!!!
D350
+1y
A quicky update cuz it's bedtime at 2 am.
May 23, 2008
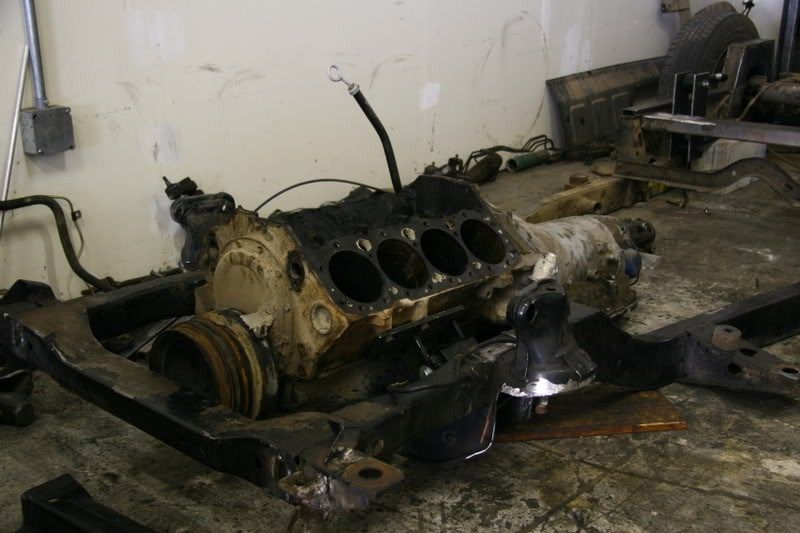
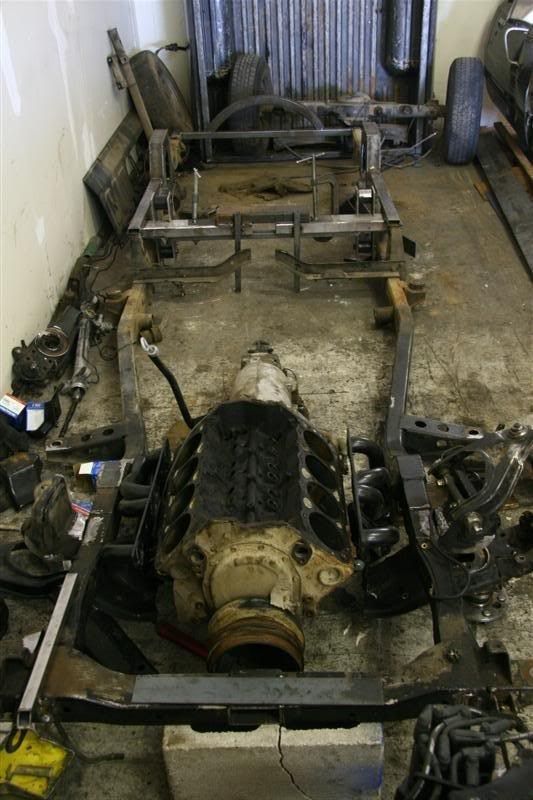
I picked up an old Chevy 350 block to use as a mock up block to build motor mounts. (It's a bitch trying to maneuver the fully built TPI while trying not to scratch it.) This makes things MUCH easier.
The engine cross member was in the way of where the oil pan sump needs to rest. Go figure. The point of the Z was to avoid rebuilding the cross member. Oh well.
I cut it out. It's gone.
Now I can move the mock up block into place and see what needs to be done. I had hoped I was going to be able to use the stock motor mount pedestals but that's not going to happen either. If I used them the motor would stick out of the hood a good 10 inches or more.
So yay. I cut those off too. I have to build custom mounts too. Things aren't going well.
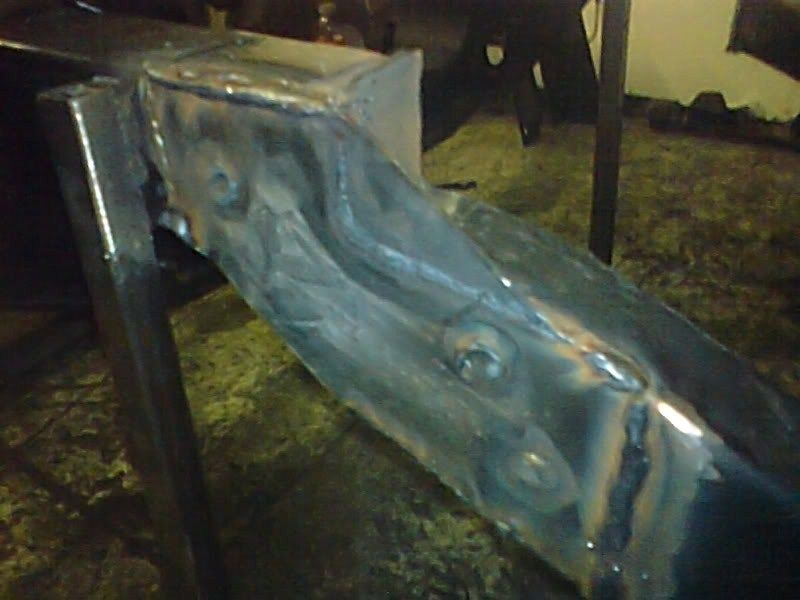
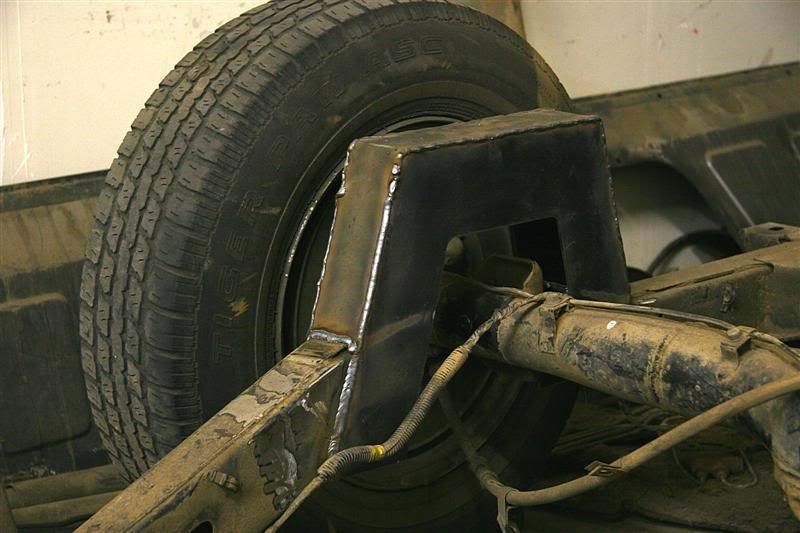
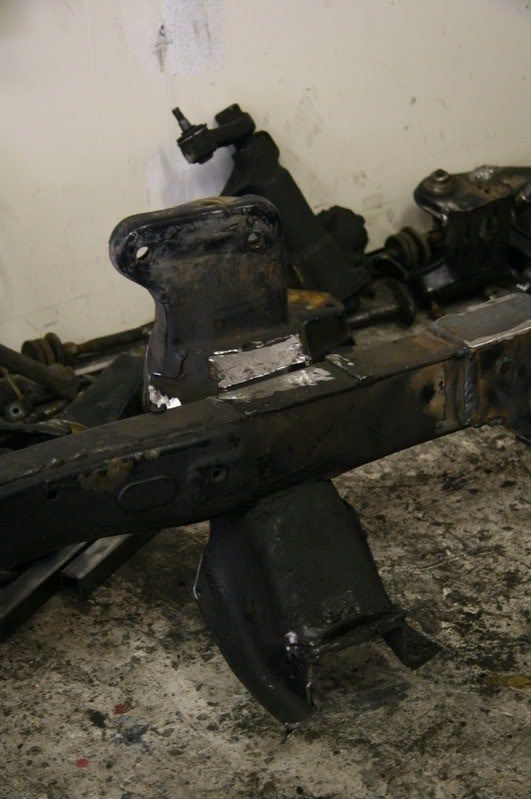
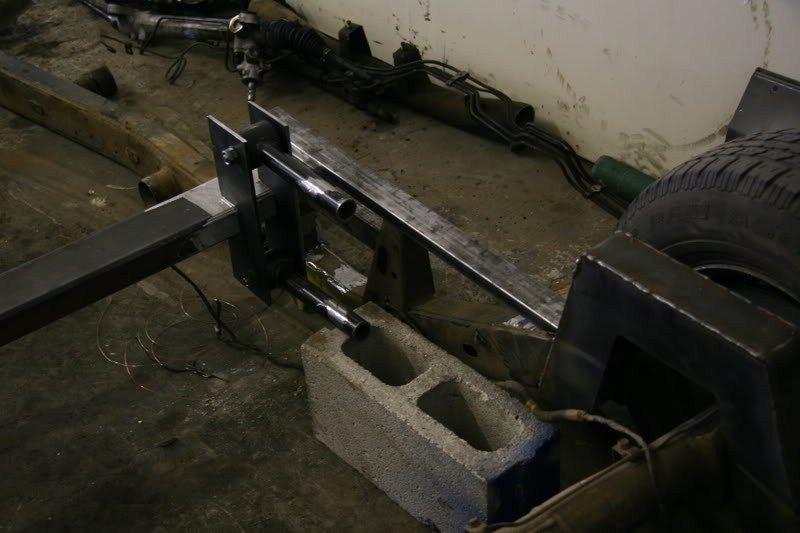
On the other end of the frame, though, I've started to construct the 4 link system and the heavy duty cross member that is going to bare all the forward force the V8 will create. After doing a lot of reading about 4 link systems, specifically anti-squat, I found I need to mount the forward 4 link mounts rather high. I'm using the bed mounts to perch the 4 link cross member and since I don't think they're meant for that kind of force, so I'm reinforcing them with some heavy tubing across the tops. (I don't plan on using these bed mounts for mounting the bed anymore) I will also box in the sides for added strength later.
To finish this update, I decided on the best way to construct my upper bag mounts for the front suspension. This required cutting a good portion of the spring cups off. I left enough there though to keep everything strong. But doing that means when everything is put together the front will still be 1.5 inches off the ground when the bags are fully deflated. Easily solved with 2" drop spindles.
All is well.
May 23, 2008
I picked up an old Chevy 350 block to use as a mock up block to build motor mounts. (It's a bitch trying to maneuver the fully built TPI while trying not to scratch it.) This makes things MUCH easier.
The engine cross member was in the way of where the oil pan sump needs to rest. Go figure. The point of the Z was to avoid rebuilding the cross member. Oh well.
I cut it out. It's gone.
Now I can move the mock up block into place and see what needs to be done. I had hoped I was going to be able to use the stock motor mount pedestals but that's not going to happen either. If I used them the motor would stick out of the hood a good 10 inches or more.
So yay. I cut those off too. I have to build custom mounts too. Things aren't going well.
On the other end of the frame, though, I've started to construct the 4 link system and the heavy duty cross member that is going to bare all the forward force the V8 will create. After doing a lot of reading about 4 link systems, specifically anti-squat, I found I need to mount the forward 4 link mounts rather high. I'm using the bed mounts to perch the 4 link cross member and since I don't think they're meant for that kind of force, so I'm reinforcing them with some heavy tubing across the tops. (I don't plan on using these bed mounts for mounting the bed anymore) I will also box in the sides for added strength later.
To finish this update, I decided on the best way to construct my upper bag mounts for the front suspension. This required cutting a good portion of the spring cups off. I left enough there though to keep everything strong. But doing that means when everything is put together the front will still be 1.5 inches off the ground when the bags are fully deflated. Easily solved with 2" drop spindles.
All is well.


D350
+1y
June 13, 2008
Lets make things a little more exciting. Even though I haven't built the engine mounts yet, I can still set my motor in place. And I can see that my headers aren't going to fit! The frame rails hug the motor too snuggly.
It makes sense. They were designed for the Chevy Astro V8 swap. Not a little D50. I looked through some catalogues to find headers that would work and nothing would. Except maybe the stock exhaust manifolds but I'd rather save gas money and put the 4 cylinder back in.
So then I started thinking... The headers don't fit. It's going to be a bitch squeezing in the steering linkage between the motor and the frame rails. The left valve cover is right where the brake booster needs to be. The enlarged trans tunnel is going cause problems with my gas pedal placement, and the posi Mustang axle I plan to use is going to need to be shortened to tuck into the bed wheel wells.
Screw all that! I bet I could solve every one of those problems and create something unique with one major mod. I could widen the entire truck 4 inches!
After doing the mod in my head over and over in search of possible problems, I decided the windsheild would be the only challenging part of the whole process. I have no idea what to do with the windsheild.
But I don't care. I'm widening the thing 4 inches! Cuz it'll be fun.
And so cutting ensued.
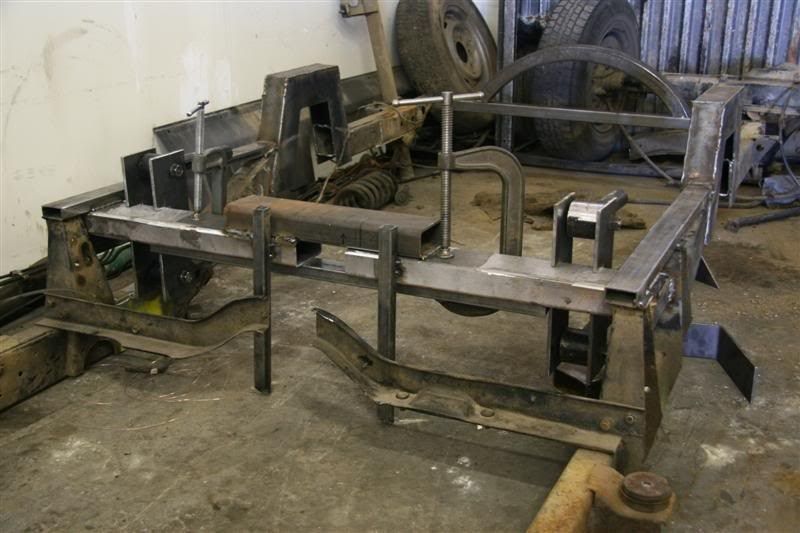
I used heavy duty steel 2x4s to space out the frame in the front-most cross member (radiator support, I cut some heavy square tubing to connect the back of the frame at the proper width, and for the 4 link cross member, I decided this would be a good opertunity to create a notch for the drive shaft to fit in when the truck is layed out. (Something I over looked when I first welded it in.)
This is everything clamped and ready to be welded. This was probably the easiest part of the whole project.
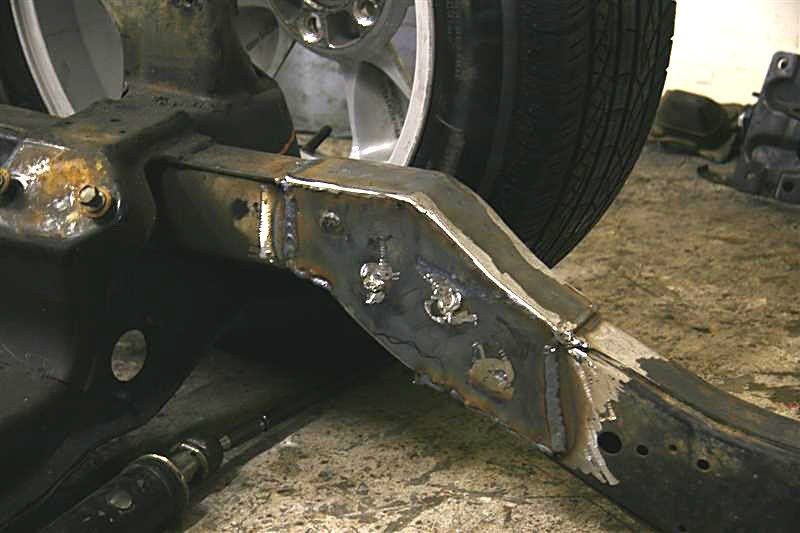
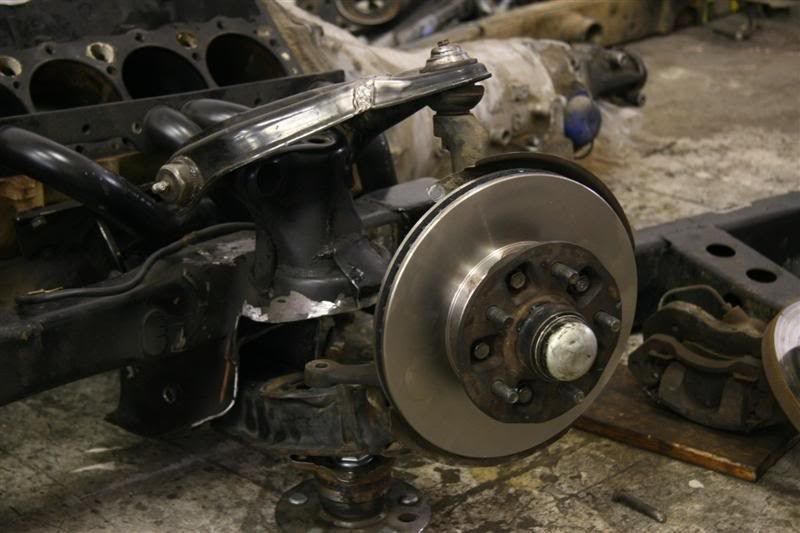
The remainder of the day I spent upgrading the front brakes. The 86 D50 came with a 6 lug hub with solid rotors. I learned from some fine people at MightyD50.com that the 94/95 5 lug Toyota pickup hubs fit the D50 spindle, and Tacoma rotors will fit nicely inside the D50 caliper bracket. The big benifit for me is the Toyota 5 lug pattern is the same as the Mustang axle I plan to use. So I'll be able to bolt my GT Bullitts up front and rear.
Lets make things a little more exciting. Even though I haven't built the engine mounts yet, I can still set my motor in place. And I can see that my headers aren't going to fit! The frame rails hug the motor too snuggly.
It makes sense. They were designed for the Chevy Astro V8 swap. Not a little D50. I looked through some catalogues to find headers that would work and nothing would. Except maybe the stock exhaust manifolds but I'd rather save gas money and put the 4 cylinder back in.
So then I started thinking... The headers don't fit. It's going to be a bitch squeezing in the steering linkage between the motor and the frame rails. The left valve cover is right where the brake booster needs to be. The enlarged trans tunnel is going cause problems with my gas pedal placement, and the posi Mustang axle I plan to use is going to need to be shortened to tuck into the bed wheel wells.
Screw all that! I bet I could solve every one of those problems and create something unique with one major mod. I could widen the entire truck 4 inches!
After doing the mod in my head over and over in search of possible problems, I decided the windsheild would be the only challenging part of the whole process. I have no idea what to do with the windsheild.
But I don't care. I'm widening the thing 4 inches! Cuz it'll be fun.
And so cutting ensued.
I used heavy duty steel 2x4s to space out the frame in the front-most cross member (radiator support, I cut some heavy square tubing to connect the back of the frame at the proper width, and for the 4 link cross member, I decided this would be a good opertunity to create a notch for the drive shaft to fit in when the truck is layed out. (Something I over looked when I first welded it in.)
This is everything clamped and ready to be welded. This was probably the easiest part of the whole project.
The remainder of the day I spent upgrading the front brakes. The 86 D50 came with a 6 lug hub with solid rotors. I learned from some fine people at MightyD50.com that the 94/95 5 lug Toyota pickup hubs fit the D50 spindle, and Tacoma rotors will fit nicely inside the D50 caliper bracket. The big benifit for me is the Toyota 5 lug pattern is the same as the Mustang axle I plan to use. So I'll be able to bolt my GT Bullitts up front and rear.

HotRodDime
+1y
this is going to be one sick little truck! I all the older truck builds, especially the ones being built to be driven!!!
D350
+1y
Edited: 2/4/2009 1:01:47 AM by D350
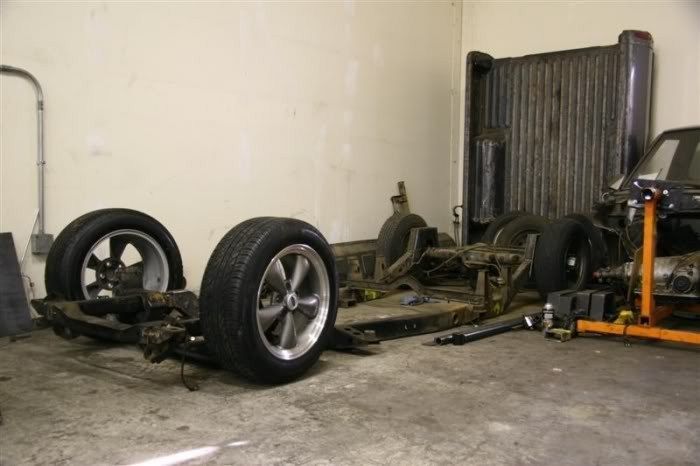
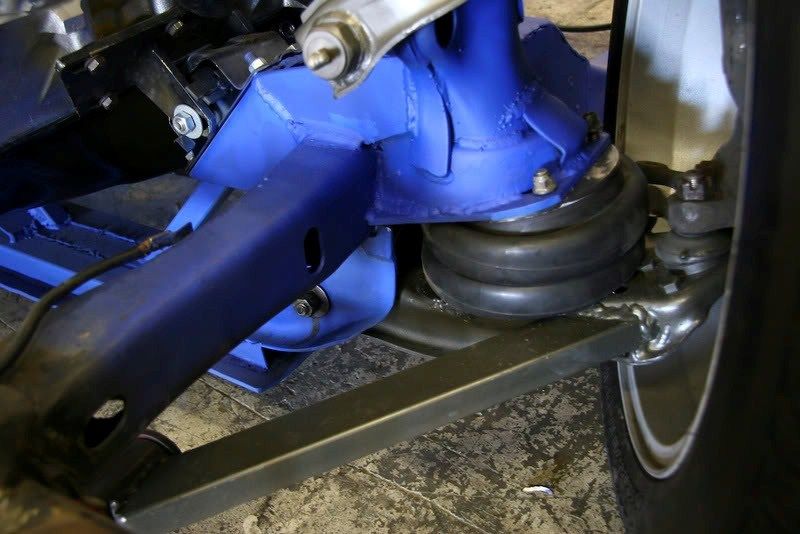
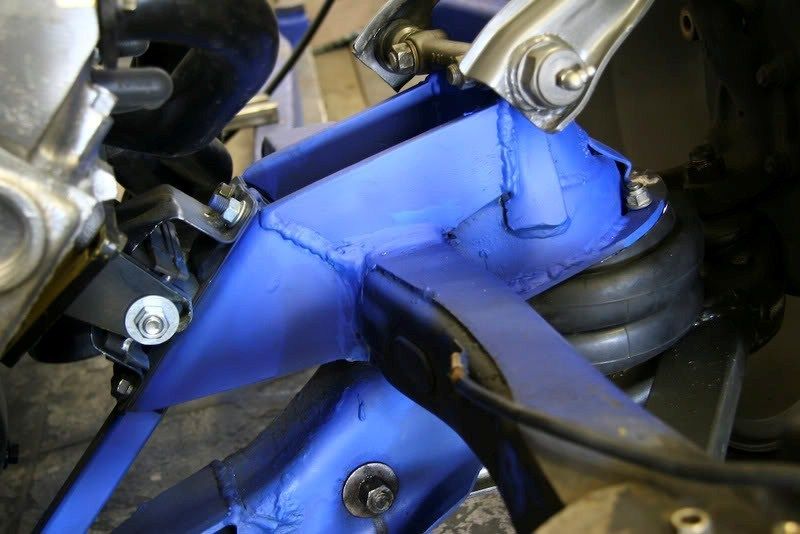
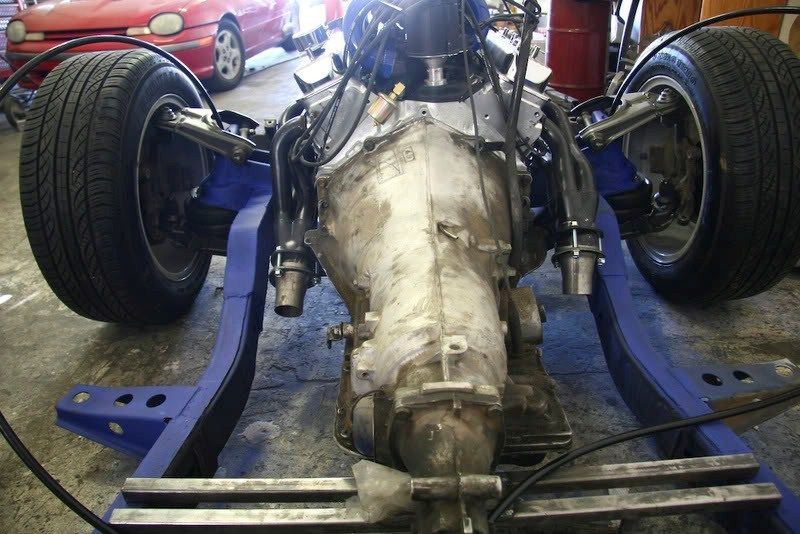
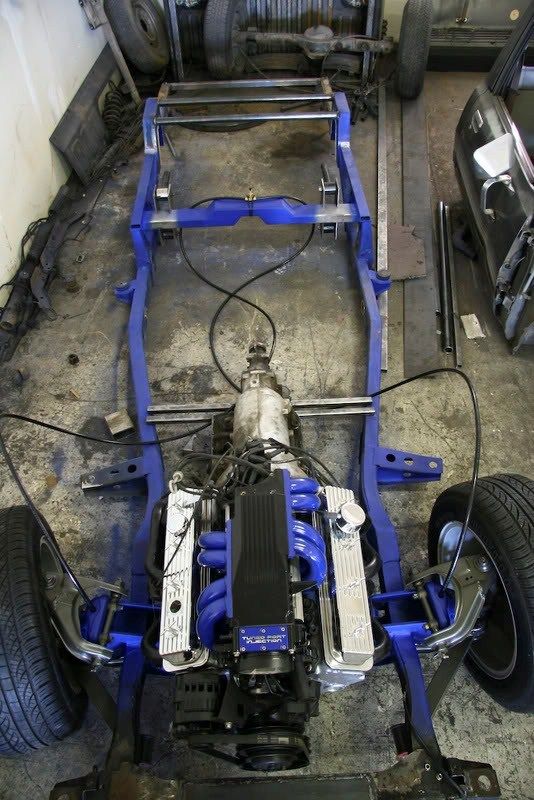
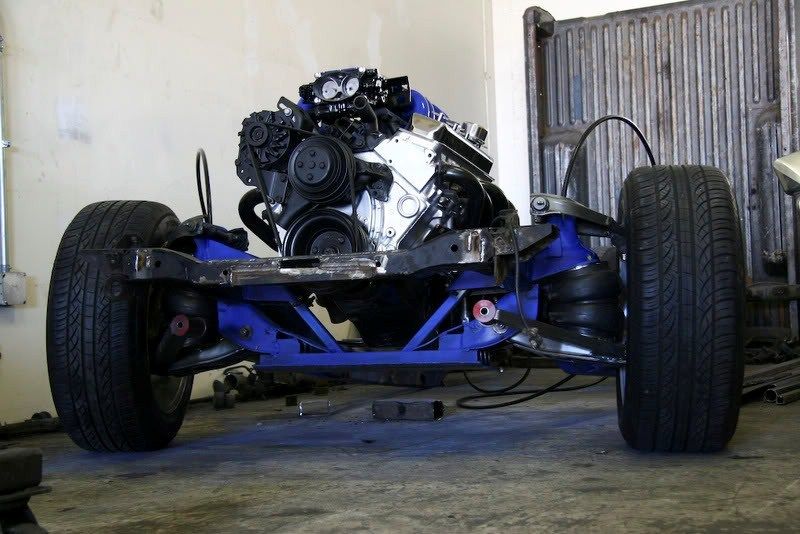
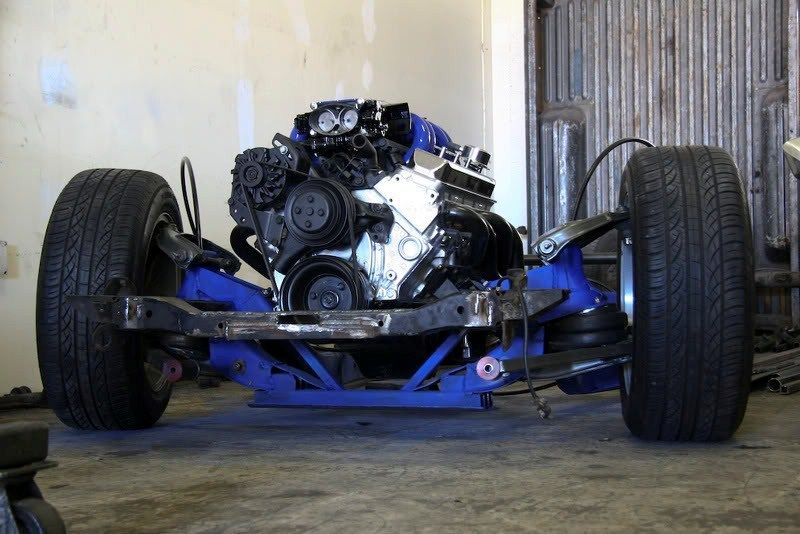
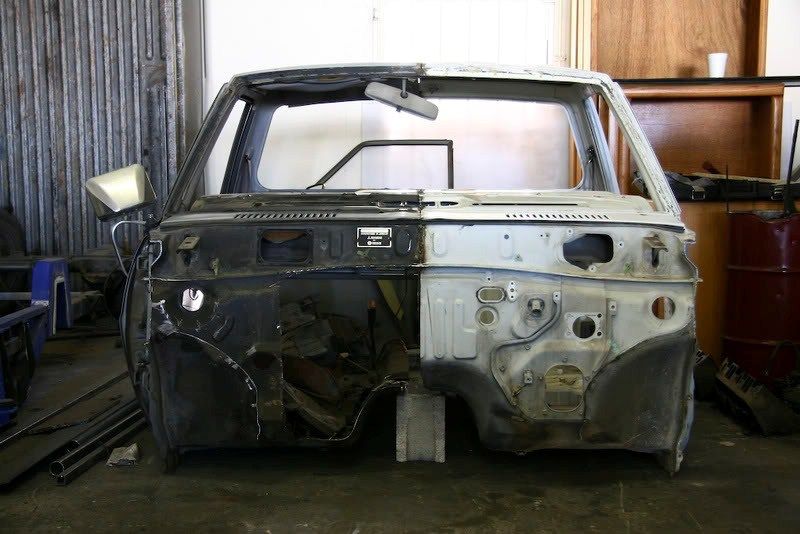
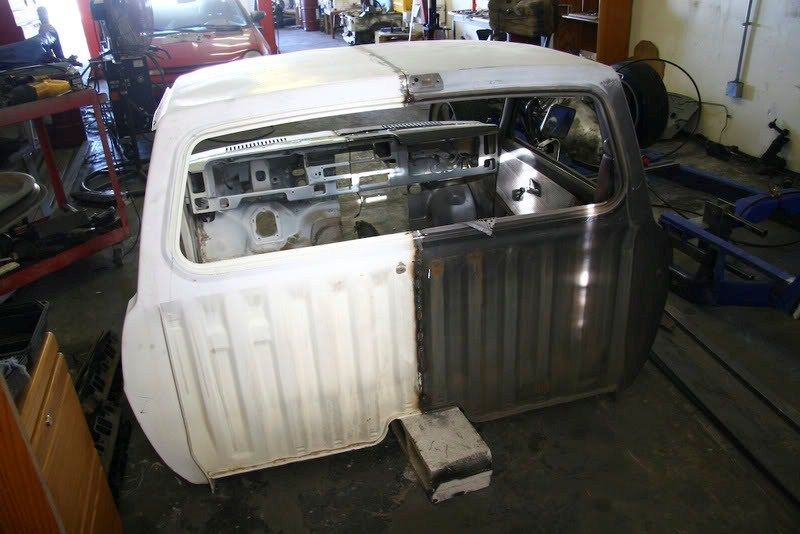
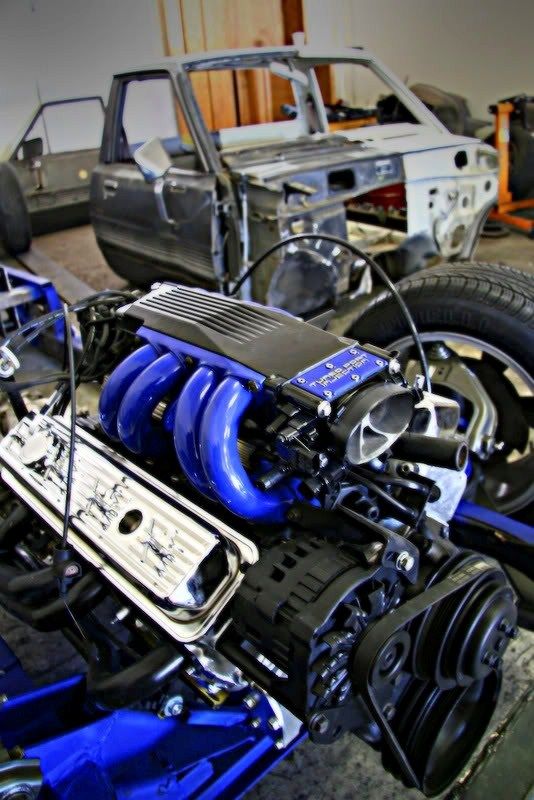
Aight... I'm going to get back into it. I took a huge break from the thread. I've been spending so many long nights working on the truck that I just don't have the energy to update as often. But I'll see if I can catch you up.July 6, 2008I got two days off for Independence Day giving 4 days from sun up to sun down to work on this beast. It was in these 4 days that it started to take shape and proved to everyone that I kinda knew what I was doing and I was serious about this project.In those 4 days I:Built front upper bag mounts that make changing bags at the side of the road a breeze, Triangulated my lower control arms to keep my toe-in in check throughout travel, Welded the link cross memember and cleaned it up to make it pretty, Built the new custom engine crossmember, Welded in a simple but meaty two-bar notch bridge, Fabricated monster motor mounts, MOUNTED the 350, and smoothed and painted the parts of the frame that won't be accessed again. Finally I mounted my Mustang wheels, plumbed some half inch line to a schrader valve so I could air up the new Slam Specialties RE7s.Link Cross Member and Notch Bridge.RE7 with Triangulated Lower Control ArmMotor Mount with 1/4" Thick GussetsHeaders Now Fit Nicely!!!The Project as a Whole.UP! DOWN! Still need drop spindles to set it on the ground.Also! On the 4th day, my good friend Erik delivered my second cab for me to butcher. I hacked it in half just off center as well as the original cab and welded them together. The final product... a cab that is 4 inches wider than stock. (Pointless bonuses are two rear view mirror mounts and two dome lights! WOOO!!) On the 5th day, I rested. Actually no... I went to work.Here's a video for you... I hope the link works...Cut Equals Custom Two Halves Make OneI'll close with my slightly arty shot..
Aight... I'm going to get back into it. I took a huge break from the thread. I've been spending so many long nights working on the truck that I just don't have the energy to update as often. But I'll see if I can catch you up.July 6, 2008I got two days off for Independence Day giving 4 days from sun up to sun down to work on this beast. It was in these 4 days that it started to take shape and proved to everyone that I kinda knew what I was doing and I was serious about this project.In those 4 days I:Built front upper bag mounts that make changing bags at the side of the road a breeze, Triangulated my lower control arms to keep my toe-in in check throughout travel, Welded the link cross memember and cleaned it up to make it pretty, Built the new custom engine crossmember, Welded in a simple but meaty two-bar notch bridge, Fabricated monster motor mounts, MOUNTED the 350, and smoothed and painted the parts of the frame that won't be accessed again. Finally I mounted my Mustang wheels, plumbed some half inch line to a schrader valve so I could air up the new Slam Specialties RE7s.Link Cross Member and Notch Bridge.RE7 with Triangulated Lower Control ArmMotor Mount with 1/4" Thick GussetsHeaders Now Fit Nicely!!!The Project as a Whole.UP! DOWN! Still need drop spindles to set it on the ground.Also! On the 4th day, my good friend Erik delivered my second cab for me to butcher. I hacked it in half just off center as well as the original cab and welded them together. The final product... a cab that is 4 inches wider than stock. (Pointless bonuses are two rear view mirror mounts and two dome lights! WOOO!!) On the 5th day, I rested. Actually no... I went to work.Here's a video for you... I hope the link works...Cut Equals Custom Two Halves Make OneI'll close with my slightly arty shot..


stlowburban
+1y
Just curious, whats the plan for a windshield?
Related Discussions in Minitruckin' Magazine
Thread
Posts
Last Post
29

last post by
e10pvmt +1y
Any Tri City, Wa Mini Truckers on here and want to hang out/ go to a show?

last post by
tacomatoy2001 +1y
0
0
last post by
tacomatoy2001 +1y
