Street Source is shutting down April 30th, 2026. Read the announcement
How to: Z a frame
Last Updated: Feb 24, 2015
I decided to do a write up on this because I had a hard time finding any info on the subject. . So a write up would help greatly for anyone lookin to do this modification. . .
* * *Only do this modification if you feel comfortable with your welding and fabrication skills. . You are cutting the frame in half! ! Do not do this frame mod if you don't think you are able or your tools cannot perform well enough to penetrate, etc. . . * * *
My name: Joshua Hoard
, TN
Truck: 1993 Mazda b2600i ext cab
Mod: Z Frame
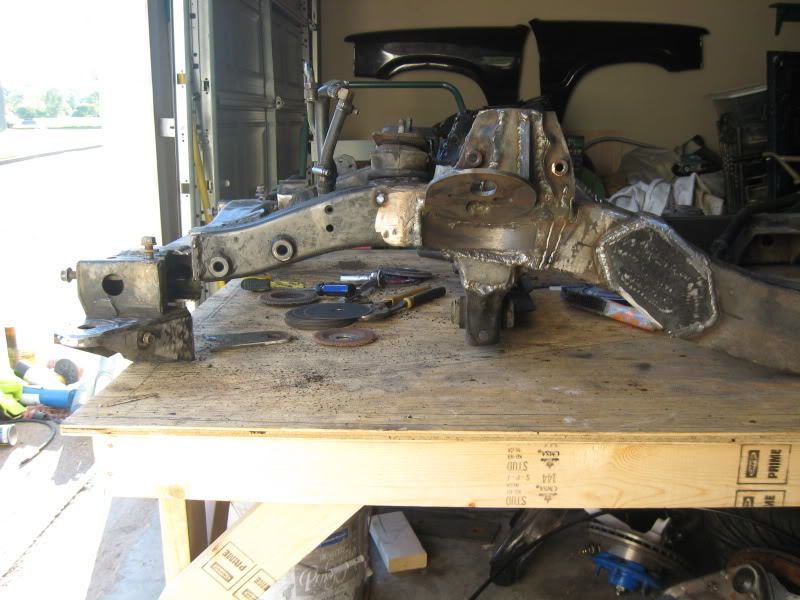
Ok, the first few steps, I didnt have my camera, so I didnt get pics, but it is pretty simple. . I made my frame completely level so when I cut the frame, it would be perfectly straight, up and down. . Mark the frame on both side, and on the top on where you wanna cut it. . . Then you need to mark 2 horizontal marks. . Whatever amount you are wanting to Z, thats how far they need to be apart. . I did a 1" Z, so my 2 horizontal lines were 1" apart. . Do these lines on the outside of each frame rail. . They are going to be the base marks for after you cut the frame and move it up. . .

Next thing to do is to cut the frame. . I used a grinder with a cut off wheel to cut the tops of each frame rail. . then a sawzall to cut down each side and to cut the bottom. . I was Z'ing the front frame with no engine or cab on it, so it was easier than if the engine woulda been in it. . But you need to support the section that you are cutting off. . Once the cut has been made, you need to raise the section that is being Z'd. . In my case, the section of frame that the control arms mount to was getting raised 1". . .
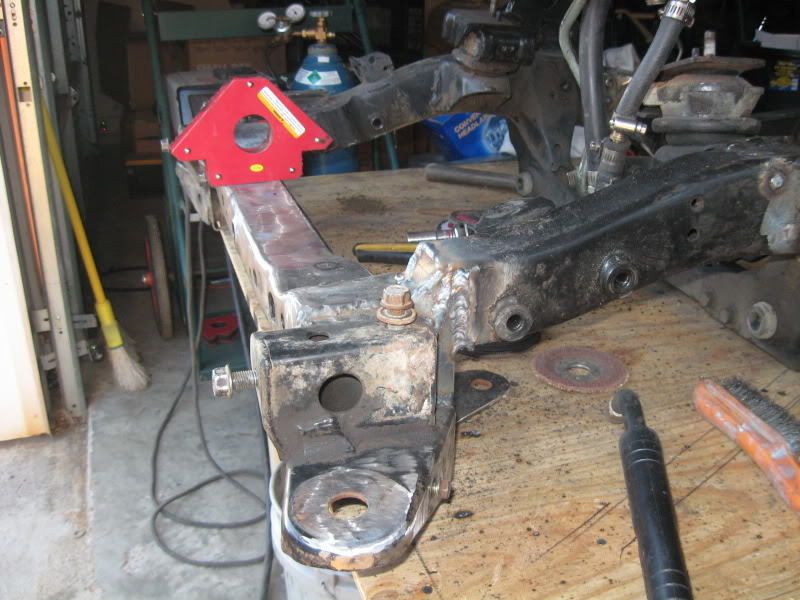
Once you have the frame raised up so the 2 horizontal marks that you made earlier are aligned, measure it again to verify that it has bee raised the correct amount. . . If it is right, then tack the frame up on the inside and outside of each frame rail to hold it in place. . . Then fully weld down the inside and outside of each frame rail. . Now you need to grind down these welds to get them as flush to the frame as possible. . Then you need to make brace plates to overlap each of the stock frame rails. . I had to bend mine a lil to get them to fit good. . . Then bevel the edges of the brace plate to ensure good penetration of the metal. . Then tack them in place, and check how it fits. . Once you are satisfied, fully weld each of the 4 brace plates on. . Then you need to make fillers for the top and bottom sides of the frame rails. . I made a small filler and a larger filler, to overlap. . . Bevel the edges of the fillers, and weld them on. . . Then you can grind em down some to get em lookin a lil better, or jus leave it and prime and paint it to prevent rust. .


Then you need to drop the front crossmember DOWN the same amount that you Z'd. . Once again, in my case, 1 inch. . I had already cut my crossmember off, but you need to decide where you feel is best to cut it, I cut mine right after the crossmember. . Then I dropped it down 1" and tacked it in place, then I made filler plates and welded them in. . My truck is also bodydropped, as you can see the frame horns dropped as well. The bottom side still needs to be braced up but that will be after a while, because I will do it when I flip the frame over. . But it is the same concept as the top side. . Just fully box in the areas that are now open and gusset it to add strength. . .
I hope this helps <img src="{SMILIES_PATH}/icon_biggrin.gif" alt=":D" title="Very Happy" />
-Josh
Credits
Created By: bodied b2600zx (josh)
Related Articles
How to: custom shifter boot
I thought i would make a thread about the shifter boot i made but although its really easy i wanted ...

How To: Chevy 105amp 3wire Alternator Swap
A.J. "SpaceMonkee" Demiar Bay Area, California 1992 B2200 (2.2 EFI) Standard Cab As t...

How To Tighten Up Loose "Tow Mirrors"
This fix is for the members that have the "tow mirrors" or "large mirrors" on yo...

Suicide Hood Hinge How To, with complete captioned photos
Chris Frye and I decided to make a tech how to out of our hood hinge install day and we chose to ha...