Street Source is shutting down April 30th, 2026. Read the announcement
R
92 b2200 + 94 Gt project
B
bigphil76
+1y
I just recently picked up a fairly clean 92 b2200 2wd single cab, no better way to start a project then to become a member with a site devoted to mazdas. I bought a 95 mustang gt a few months back with the soul purpose of using it for a donor car. Due to the fact that the undercarriage is rusted beyond repair but the complete drive train/power train is in remarkable shape. It is a 5 sp car. With very few mods such as Cai,exhaust and under drive pulleys. I'm no newbie to fast cars or even v8 trucks but have never fooled with a mazda. My intentions are to build a semi sleeper. Still want to to look ok but more importantly be fairly quick on the street and track. But at first I just want to get it assembled work out the kinks then I will focus on power adding. And of course the truck curse of hooking it
I will be keeping it fuel injection. I have seen that ultimate customs use to make a kit but went out of business. Does anyone have the exact measurements of where the driver side motor mount is relocated? how far to drop the engine crossmember? And how the trans member is modified?
I will attempt to start posting pics this weekend. And I'm also a tight budget man like the rest of us.

sincitylocal
+1y
Not sure if the 95 still ran the 5.0, but some say you can use the Mustang 5.0 mount with the original Mazda frame perch. I cannot verify this, as I have an L98 in mine. Trans mount will almost surely need to be fabricated.
Here's the one I made for my 700R4.
Here's the one I made for my 700R4.
B
bigphil76
+1y
Thanks...yes it's a 5.0 car 5sp. I have read that the passenger mount pedastal will work but new hole will have to be drilled on the drivers side for mount relocation

crazycracker
+1y
Hi, I'm working on a SBF swap as well. My engine is an '85 5.0 from a Mercury Cougar, I believe everything is the same or very similar to your '95 5.0 block. I used my existing motor mount brackets and original replacement parts store motor mounts (just so as to have "fresh" motor mounts instead of reusing the 30 year old ones) and re-drilled the holes for where the motor mount connects to the bracket. Much easier to show instead of explain, but I did not take pictures (very sorry!). This basically allows the motor mounts to sit farther back by about 3/4 inch, so that I didn't have to beat the firewall or destroy the speedometer cable (where that speedo cable exits the firewall is right by the cylinder head).
Doing that allowed my engine to sit in place but it was basically resting on that crossmember. To alleviate that I put 1 inch spacers between the motor mount brackets and the engine block, so as to raise the entire engine by 1 inch. This worked well; too well in fact, as it caused me some hood clearance issues with distributor and air cleaner. If I was doing it over, I would use 1/2 inch spacers (you may think the 1/2 inch difference is not much, but because the engine is on a slight incline and the motor mounts are now a little bit further back, that 1/2 inch at the motor mount corresponds to about an inch & a half at the front of the engine).
If you have the ability to modify your crossmember then you could skip that whole rigamarole of raising the engine up and have all the clearance you need up top.
B
bigphil76
+1y
I never even thought about shimming the motor mounts up. That would be more practical. I plan on leaving mine fuel injection. I dunno if my upper planum sits higher than a air breather so that could be a solution for modifying the crossmember. My plans for the engine cross member is to cut each side but leave enough room for 2 decent size bolts. Drill 2 holes in each side and make 2 brackets for for each side of the cut section and make it bolt in....
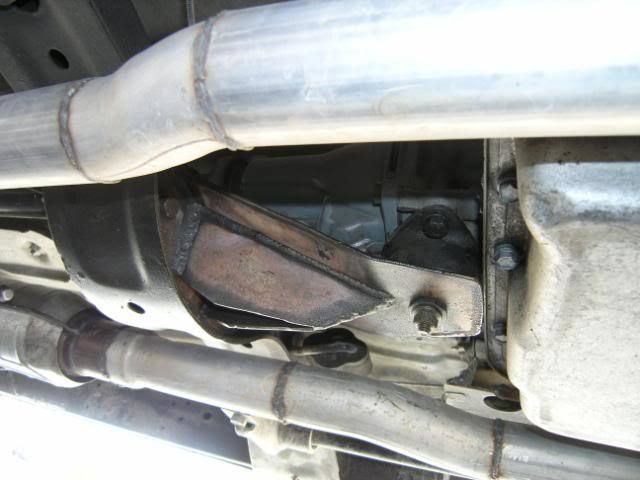
crazycracker
+1y
Here is an idea of my clearance issues, this was using a HEI style distributor that is taller than the stock style. It was a no-go, I got a different one that is more stock style in size and everything fits ok. But I did have to go with a drop-base air cleaner and 2 inch element for my carburetor, to avoid hood interference. I do not think I would be able to run an EFI manifold unless I removed the spacers and let the engine sit down further. But like I said before, if I had gone with 1/2 inch spacers I think I would have had the clearance without all the hassle. And now that I have the transmission and everything in place, I see about 3/4 inch clearance between my oil pan and the crossmember, its not nearly as tight as it appeared to be when I was first trying to muscle the engine into place.
B
bigphil76
+1y
That's a great picture for reference. I see what your saying... I don't think there will be any way around me modifying the engine cross member now. Shouldn't be too Bad of a job I just don't want it to look cobbled.
B
bigphil76
+1y
Tried to post pictures from my Samsung phone but can't quite figure it out...pulled engine and trans tonight with a buddy about 4 hrs without cutting any wires or breaking any sensors. Everything was pretty simple. The engine crossmember is already bolt in which I didnt know. So it will be alot more simple building brackets for it to drop down.
Note: pulling engine there is a hose directly below power steering pump. It's not visible unless skid plate is dropped or the engine has been lifted a few inches
Note: pulling engine there is a hose directly below power steering pump. It's not visible unless skid plate is dropped or the engine has been lifted a few inches

mymmeryloss
+1y
Get the tapatalk app if you are posting from a phone
B
bigphil76
+1y
://images.tapatalk-cdn.com/15/05/07/591121916cade7974b6c6936449a845a.://images.tapatalk-cdn.com/15/05/07/e8d5fcc34c9b4315b09ae15038b977b0.://images.tapatalk-cdn.com/15/05/07/33caa9112674b7519e07d469dc47c4d0.://images.tapatalk-cdn.com/15/05/07/5a5d5640c1f5370ef1c5ab23d980abb6.jpg
Related Discussions in Mazda Projects
Thread
Posts
Last Post
852

last post by
skrapinsask +1y
150

last post by
cherokeed +1y