Street Source is shutting down April 30th, 2026. Read the announcement
Watermarking images?

Jance Customs
+1y
Edited: 3/10/2009 5:30:51 PM by Jance Customs
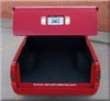
I have manually watermarked all of my show coverage images over the years so to cut back on time I want to automatically watermark my images. Instead of putting my logo in the bottom corners I want to put them in the center but I don't want to take away from the picture, so how can I make a bottom border that actually doesn't cover up that much of the original image? Here is an example.
I really like the whole "picture frame" look but I don't want to copy what Nick has done with his images. I might come up with something different later. Is there a program I can use to watermark my images in batch so I can get them online faster? Thanks!

tlw32882
+1y
im wondering about this to? its a bitch when you 500 images and do them all manually.

KEG Media
+1y
make your border or whatever you want on each pic then record an action while doing a copy paste onto your image. make sure everything is the same size. only do horizontal with horizontal etc. then run a batch in photoshop. repeat for vertical.
Jance Customs
+1y
I've never used the "action" before. What all does it take to get it working? Will I have to manually click the action for each photo or will it do a batch automatically? Thanks for the reply!

ShakinPlates
+1y
Edited: 3/11/2009 4:12:44 PM by ShakinPlates
I could be wrong here but, basically PS will "record" every procedure you do until you hit the stop button. If I remember, you want to use the "action" tab where the history pallete is. Just open a photo and push record, do your watermark, save, exit, then hit stop. Now, I think you go to file>automate>batch. From there you can pick your action that you just made in the drop down, select the folder w/ your pic's and on the lower part select your destination, and that should do it! PS guru's please correct me if there is a easier way...
I could be wrong here but, basically PS will "record" every procedure you do until you hit the stop button. If I remember, you want to use the "action" tab where the history pallete is. Just open a photo and push record, do your watermark, save, exit, then hit stop. Now, I think you go to file>automate>batch. From there you can pick your action that you just made in the drop down, select the folder w/ your pic's and on the lower part select your destination, and that should do it! PS guru's please correct me if there is a easier way...
Jance Customs
+1y
Thanks Kyle! I don't think I am doing it right. I can do the action part just fine, but when I open a new photo and hit "play selection" it doesn't want to keep my watermark? I open my picture and then my logo, i copy the logo onto the picture to tag it, then i hit record and move it into place, then i save it and hit stop. I open a new image and hit action and it doesn't put the logo on the new image? Did I miss a step?
ShakinPlates
+1y
I will tinker with it when I get to work tomorrow. We are really close.... you want to copy your logo to the "clipbord" (copy) so you can essently hit record> paste as layer>place>save>close>stop I dont know it its that easy though. I did this back like 3 years in my PS class so im a little rusty.
Jance Customs
+1y
Edited: 3/12/2009 12:27:27 PM by Jance Customs
Thanks for the help! I hope to get something worked out so I can change it up a little for Tex Mex next weekend.One thing I'm confused on is save, close and then stop? Wouldn't it be save, stop, then close?
Thanks for the help! I hope to get something worked out so I can change it up a little for Tex Mex next weekend.One thing I'm confused on is save, close and then stop? Wouldn't it be save, stop, then close?


ShakinPlates
+1y
Edited: 3/12/2009 1:04:40 PM by ShakinPlates
GOT IT!!!! Jance you owe me your soul for this one..... A couple tips and things to be aware of for this to work smothly: -Pictures that you are running in the batch must be same size-Group different sized photos as you will have to create or modify a action and run the group one at a time.-Label each action accordingly for future use as they will save into the actions palete example: 1600x1200horizontal -Its best to create a "Set" (A master folder) in the pallete to easily confine your actions in it for future refrence 1. Open one of your photos in the folder you want to mark2. Open your logo3. If your logo is layered, merge into one and select all (CTRL + A) 4. Copy (CTRL + V)5. Go to your photo that you opened and paste (CTRL + V)6. Resize the logo if needed 7. Copy the logo one more time.8. Delete the logo9. Go to actions palette, on the bottom click on create new set (optional)10. Click on new action. (Name it if desired)11. Time to record! Hit the rercord button12. Paste logo (it should already be rezized) on to photo13. Move logo to desired position14. Save to the folder you want to put the photos in15. Hit Stop!16. Go to File>Automate>Batch17. Select the set and action you made in the drop down boxes.18. Select the folder you want to process.19. Select Folder in the destination area and hit choose and point to your output folder20. Check Override action save as commands21. Specify what naming convention your files want to be in22. Hit ok!!!! Check your output folder and you should have the same photos with your watermark on them!!! This is the only way I could figure out how to do this. All of you feel free to critique my procedure to make this easier. Maybe we could even sticky this....
GOT IT!!!! Jance you owe me your soul for this one..... A couple tips and things to be aware of for this to work smothly: -Pictures that you are running in the batch must be same size-Group different sized photos as you will have to create or modify a action and run the group one at a time.-Label each action accordingly for future use as they will save into the actions palete example: 1600x1200horizontal -Its best to create a "Set" (A master folder) in the pallete to easily confine your actions in it for future refrence 1. Open one of your photos in the folder you want to mark2. Open your logo3. If your logo is layered, merge into one and select all (CTRL + A) 4. Copy (CTRL + V)5. Go to your photo that you opened and paste (CTRL + V)6. Resize the logo if needed 7. Copy the logo one more time.8. Delete the logo9. Go to actions palette, on the bottom click on create new set (optional)10. Click on new action. (Name it if desired)11. Time to record! Hit the rercord button12. Paste logo (it should already be rezized) on to photo13. Move logo to desired position14. Save to the folder you want to put the photos in15. Hit Stop!16. Go to File>Automate>Batch17. Select the set and action you made in the drop down boxes.18. Select the folder you want to process.19. Select Folder in the destination area and hit choose and point to your output folder20. Check Override action save as commands21. Specify what naming convention your files want to be in22. Hit ok!!!! Check your output folder and you should have the same photos with your watermark on them!!! This is the only way I could figure out how to do this. All of you feel free to critique my procedure to make this easier. Maybe we could even sticky this....

DougyFrisch
+1y
Very well played Kyle, i actually typed up a reply last night but it didn't go through and i got pissed off and gave up to type it all out again, i'm glad you were able to take the time to do it now, lol. although i would like to make a couple tweeks... Although you could go download a 3rd party resizing software, you can do it in photoshop and built right into the action as a matter of fact. so no need to resize them all before you run the batch. you can do this by running a resize at about step 12, although you don't wanna type in a pixel size like 900x600 or 600x900. because that would mean you would have to run a batch on all horizontal pix and also another batch for all verticals, which would be time consuming and a waste. instead do a few test runs before you run and action and figure out a percentage that you would like the photo to be reduced to instead of a static pixal size. this will allow you to batch both hori and vert pix in one single batch run... depending on what you shoot your photos in on your camera, you will prob be in the ballpark of 20-30% and make sure you do 72dpi to make em web safe. Also you will need to remember to just save you logo template on a separate file, because you will need to open that file and copy the logo to your clipboard each and every time you want to run a batch. that is if you have copied something else to your clipboard, which would then overide your logo thats saved. also note that you can add your borders into the action, you can do that by adding the border after you do the resize. you can do it several ways to get a bunch of different effects, such as Nicks thick black w/a thin white line border. or mine that has a thick border, a gap, and then another small black line. but a simple black border can be made by recording Select>All and then Edit>Stroke to add your desired sized border. Well i hope that helps you out a lil bit and isn't too confusing... enjoy actions, they are your friend, trust me.
Related Discussions in Photoshop
Thread
Posts
Last Post

