Street Source is shutting down April 30th, 2026. Read the announcement
Updated Custom Door Panel w/ buildout Tech
Last Updated: Feb 24, 2015
Some people have been asking for the photos of this tech article so I have updated the post with the pictures that I currently have. I will redo a full writeup with full pictures within the next couple of weeks.
Heres a complete writeup on how to make a basic custom door panel with a fiberglass buildout. The pictures are mainly of a set for a body dropped truck (thats why the buildout is so high) but some are of a different set. The pictures are to illustrate a certain step in the process so don't worry if the pics don't match up. To start heres a list of tools and materials that you will need.
Tools-
Drill
Various Drill Bits
Jig Saw
Scisors
Dollar Store Paint Brushes
Router
Materials-
4 Sheets of 2'X4' 1/8" hardboard (danish hardboard, etc)
Sandpaper
Wood Glue
Spray Adhesive (Sluyter 470 or 476, 3M Super 77 sold at home depot)
1 Yard of Tweed
3/4" dowels
3/4" MDF
Thick Fabric Material
Fiberglass Resin
Body Filler
THE BUILD:
1. Remove your old door panels from your truck and strip them of their old covering. Take the old panel and lay it over a new piece of 2'X4' 1/8" hardboard. Trace your old panel including clip holes, window crank, door handle and arm rest. Leave out anything that you don't want. If you are adding a buildout now is the time to mark its location. Make sure that you take into account the window crank, different seats or if you have a BD. Once marked cut out the panel should look something like this but with clip holes, etc.
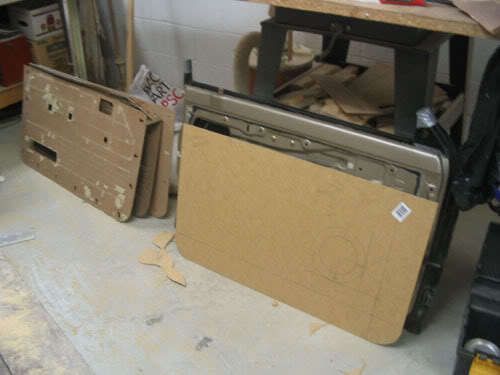
Repeat for the opposite side.
2. So now you should have 2 door panels that look almost the same as the stock panels. Mark one as the drivers side and one as the passengers. This will save any confusion later. Now its time for your design. Take one of the panels that you just cut and lay it over another piece of 2'X4' 1/8" hardboard. Trace it out again and include everything except for the clip holes. Draw out your design. The more simple the design the better it will look. Tight complicated designs tend to get lost in tweed. Once drawn cut it out. Be very careful around thin points. It should look like this.
Lay it over your newly cut panels and you should have something like this.
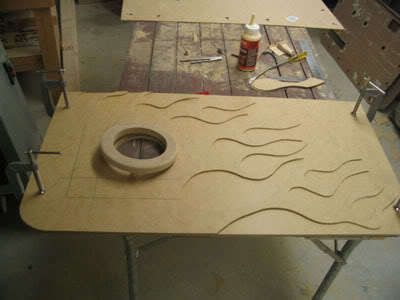
3. Glue the 2 pieces of the panels together using wood glue. Once glued I would press them together while drying. Use anything that you can that gives even pressure throughout the 2 pieces.
4. To make the buildout cut 2 trim rings out of 3/4" MDF the size of your speakers. Make the width of the ring about 1"-1 1/2" depending on the size of your speaker lip. Router the outside edge with an inverse quarter round. Take your rings and aim them in the direction that you want them to point. Cut dowels to prop up the speaker in the direction that you figured out earlier.
Drill through the center of your cut dowel lengths so that you can screw them in from the backside of the panel.

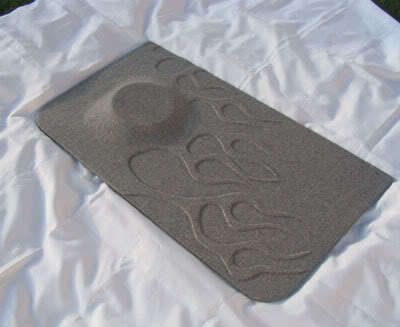
5. Nows the time to sand down the whole panel and test fit it on your truck. This is the time to make it fit perfectly. Take your time on this step and it will make the panel look 100 times better.
6. To fiberglass the buildout take material (sweatshirt, stereo carpet, thick tee shirt) and stretch it over the buildout. Staple the edges untill its tight and forms a nice shaply buildout. Make sure that its tight so when you resin it doesn't sag. Mix up some fiberglass resin and use a paintbrush to soak the material and surrounding hardboard.
Use 2 coats of resin as a minimum. Check to make sure that the buildout is hard enough. If it still has lots of flex renforce it with more material and resin.
***I have learned a new way for this step and this is how I used to do it. When I get pics I will post the new way. It makes the buildout stronger with less work.
7. After the resin is dry take a small grinder and smooth out any spots, runs, etc. Apply body filler over any uneven spots or dips. It doesnt have to be paintable smoothe but it has to be good enough for the fabric to flow over it smoothly. Use 180 grit sandpaper at the most (leave something for the tweed to grab on to.
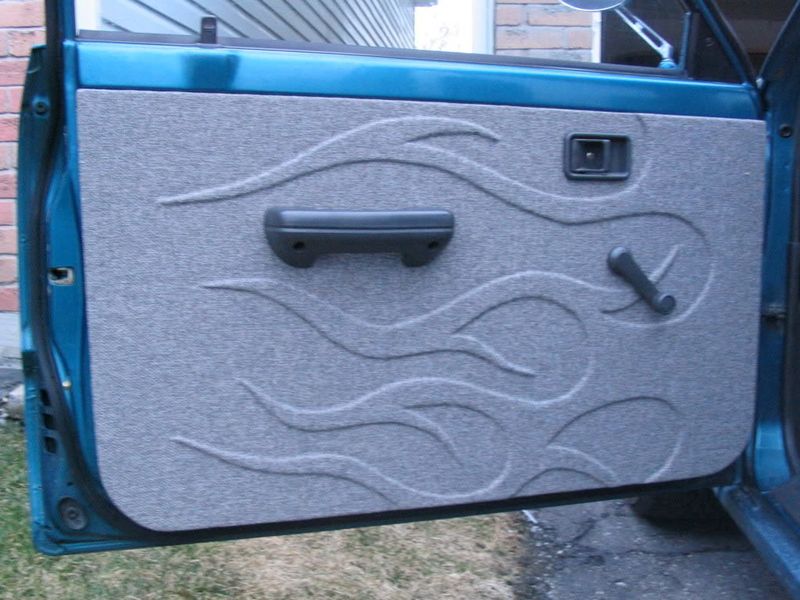
8. Cut out the openings for your speakers using an exacto knife or the like. Go over the panel for any imperfections. Its time to cover the panel. Three spray can glues that I found that work the best are Sluyter 470 or 476 and 3M Super 77 thats sold at home depot.
Start by cutting a piece of tweed thats about 4 inches bigger than the panel all the way around. Start spraying the glue on the flattest end of the panel. Spray only the panel (if you spray the tweed it may bleed through), let it tack up for about 20-30 seconds and lay the tweed overtop. Try this on a test piece first to see how much glue to use. When your going overtop of your design use your fingernails outline the design and make it stick.
Any questions?
Credits
Created By: sierrax
Related Articles
1992 b2600i 4x4. Chevy 17 wheel custom fit center hubs
I could not find a write up on anyone doing a Chevy wheel swap onto a 4x4 so here it is. Wheels are...
How to: custom shifter boot
I thought i would make a thread about the shifter boot i made but although its really easy i wanted ...
(HOW TO) TECH WRITE UP ON DRIVE SHAFT BRAKES: (HOW TO)
TECH WRITE UP ON DRIVE SHAFT BRAKES: The idea here is to make the truck look cleaner at the wheels ...
HEADLIGHT WIRING UPGRADE - CUSTOM HARNESS - PICS UP ENJOY
So the first thing you need to do is figure out what you are going to do with your lighting, are you...